

It’s here! After months of testing and more than a little teasing, Google officially took the wraps off its beefy Android 11 update on Tuesday. The software is already rolling out to Google’s own Pixel phones, as you’d expect, and should be making its way to more devices before long.
You’ve probably heard plenty about Android 11’s most important additions and even its hidden gems by now — and if not, by golly, the ever-so-subtly included links in the first part of this sentence will get you caught up in no time. (Funny how that works, isn’t it?) Now, though, it’s time to turn our attention to some purely practical matters and think through specific steps you should take in order to make the most of what Android 11 has to offer.
Why? Well, lemme tell ya why, you curious little chinchilla: With this update in particular, some of Google’s most interesting and useful additions require a teensy bit of fine-tuning in order to be fully effective — and as the serious business-minded user you so clearly are, you obviously don’t want to dilly-dally in making those adjustments. The good news, though, is that it doesn’t take long to get your phone fully optimized and ready. It’s just up to you to do it.
So consider this your road map to making the most of Android 11 and making your newly upgraded phone as efficient as possible — for enterprise use, for personal use, and for any other earthly purpose your humble electronic companion might serve.
Android 11 adjustment no. 1: Enable notification memory
One of my favorite Android 11 features and something I’ve been longing to see for ages is a new native Notification History section. It’s pretty much exactly what you’d expect: Anytime you swipe a notification away by accident (and what clumsy-fingered doofus among us hasn’t done that?!), you can quickly hop over to a history page and pull it back from the ether. Handy, no?
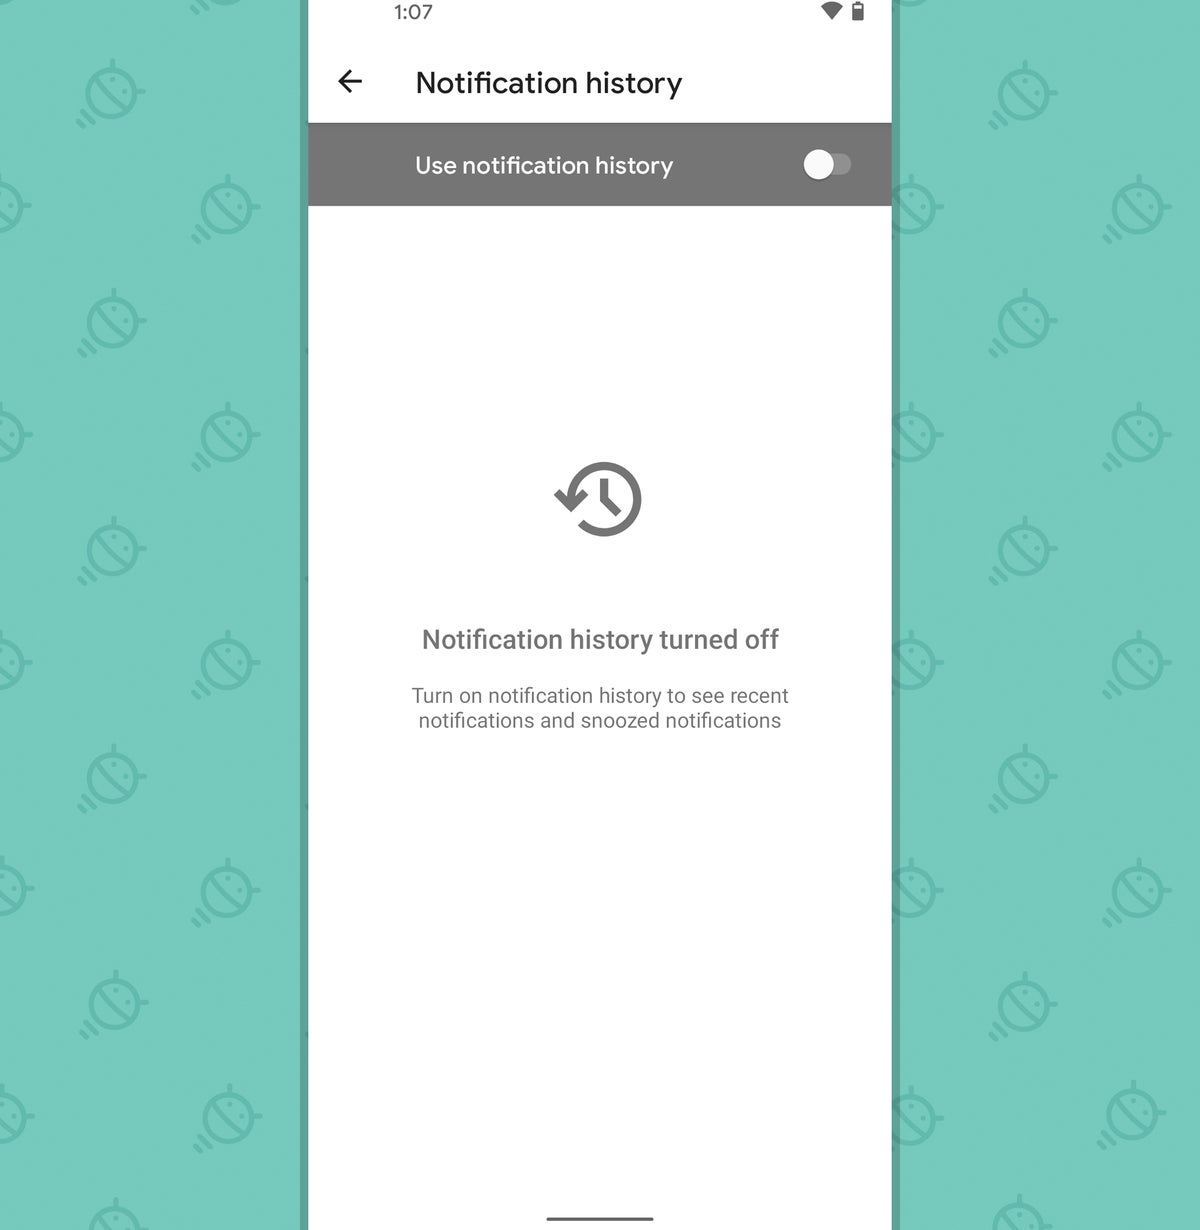
There’s just one catch: For some reason, Android 11’s Notification History option isn’t enabled automatically by default. So unless you take the time to turn it on, it’s not gonna be there when you need it.
Thankfully, that tiny little problem couldn’t be easier to rectify: Just open up the Apps & Notification section of your system settings, tap “Notifications,” then tap “Notification History.” (If you’re using a phone where the settings are presented differently, with this or any subsequent instructions in this story, try searching your settings area instead. That’ll get you to the same place.)
Now, see the toggle at the top of that screen?
 JR
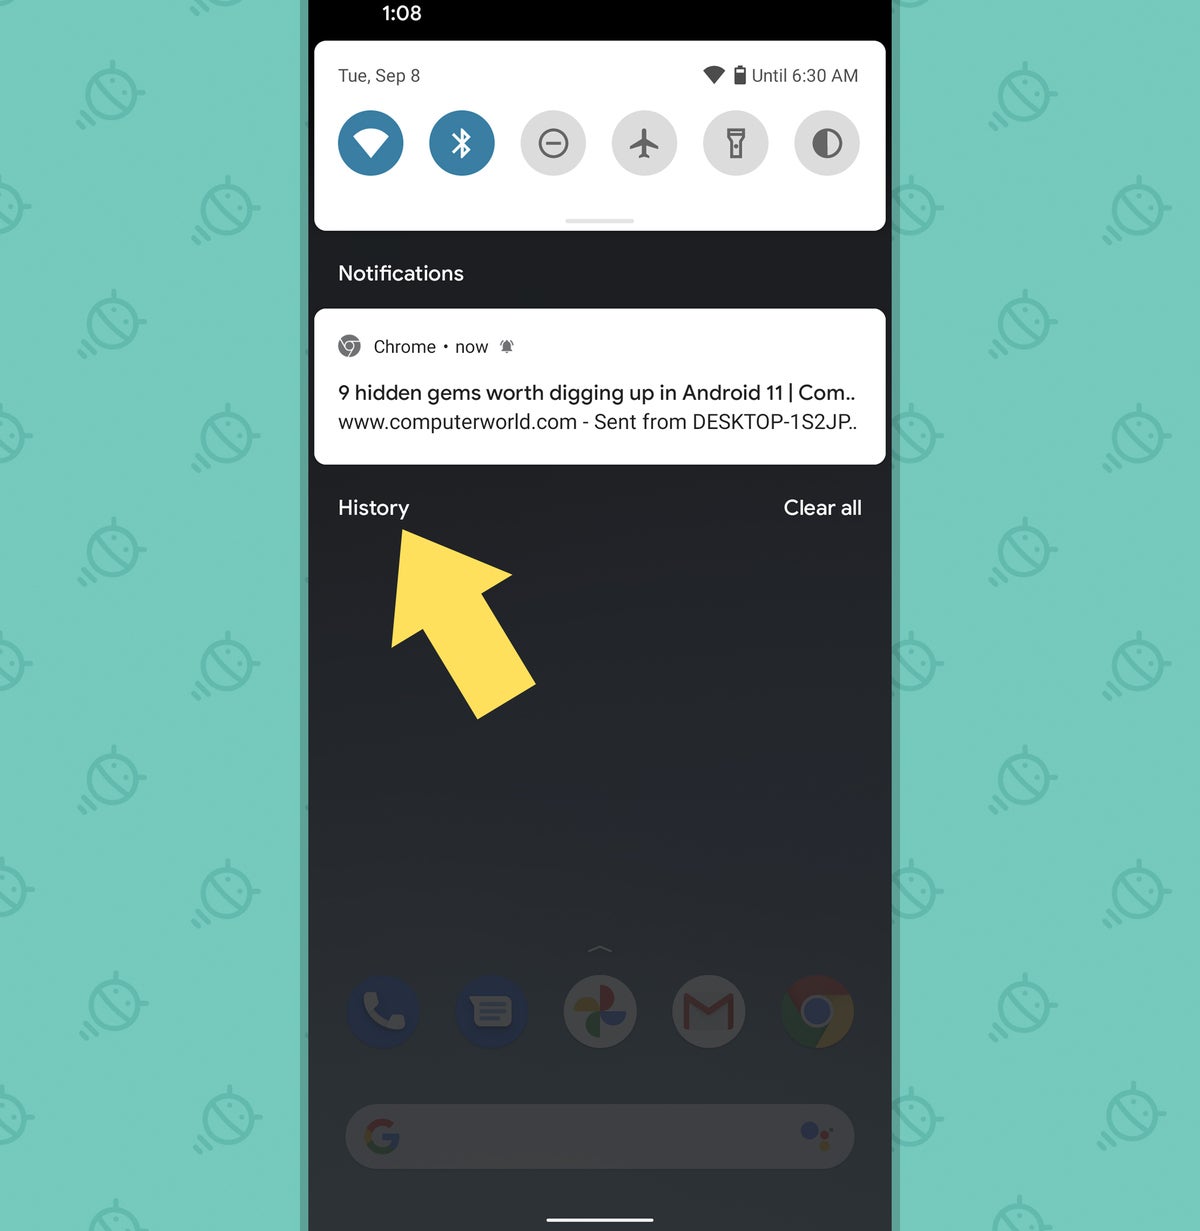
JRFlip that bad boy on, and that’s it: Anytime you have at least one notification pending, you’ll see a new “History” option in the lower-left corner of your notification panel.
 JR
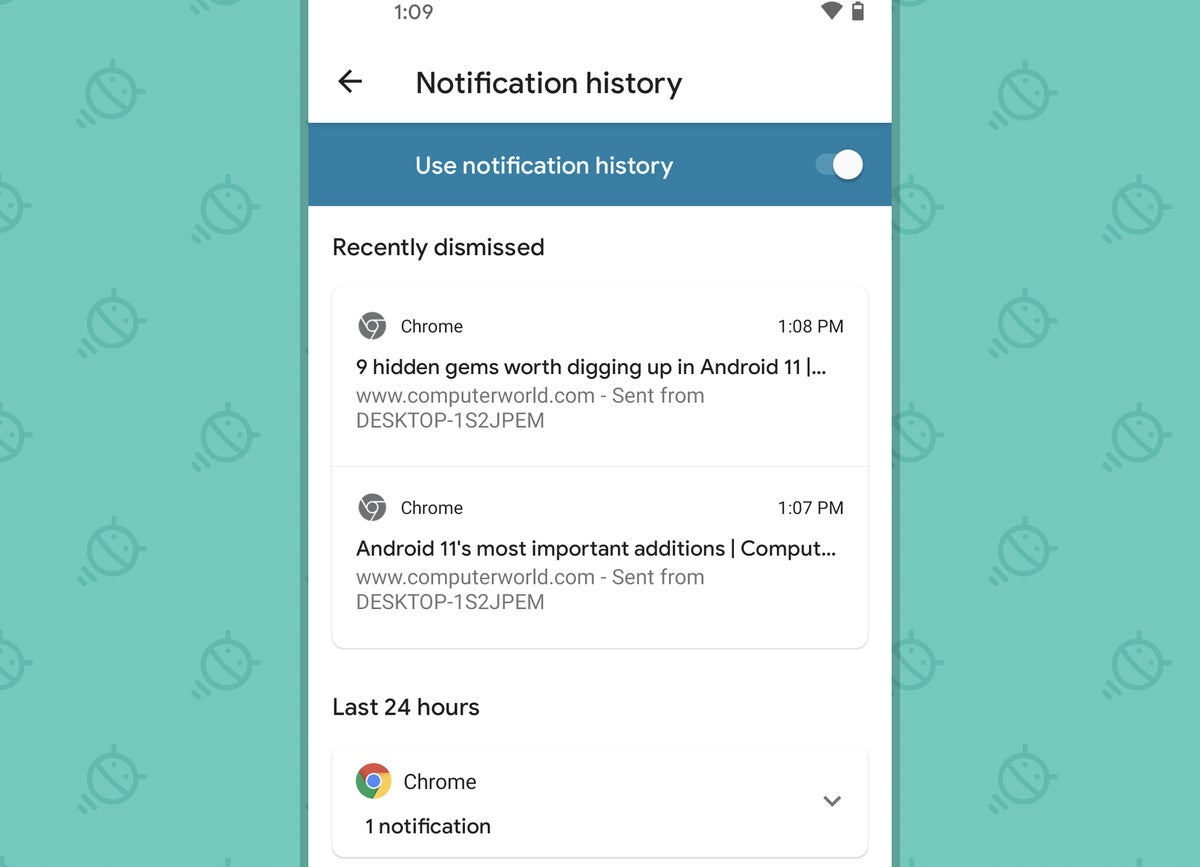
JRTap it, and you’ll be face to face with a complete list of every notification you’ve gotten over the past 24 hours.
 JR
JROddly, the option doesn’t show up when you have no active notifications — something that seems like a bit of an oversight, if you ask me — but fear not, for you can always get to it by going to that same “Notification History” area of your system settings, if needed.
And speaking of notifications…
Android 11 adjustment no. 2: Embrace priority notifications
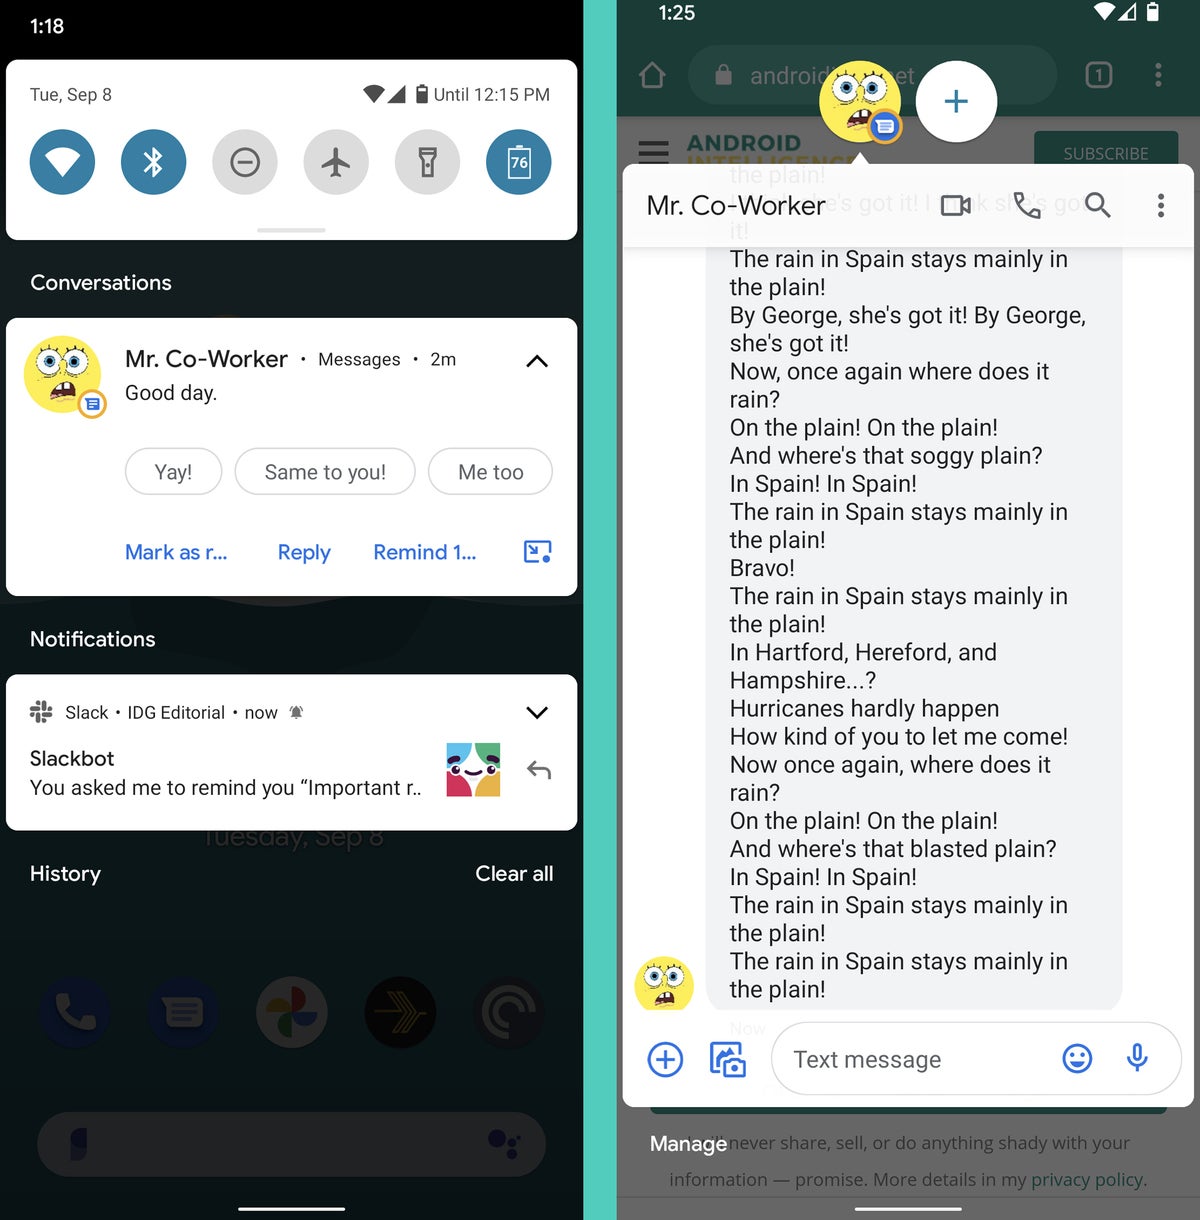
Android 11 adds a new conversation-specific section into the notification panel, and part of that includes a new priority conversation setting that you can apply to specific humans or marsupials who message you.
Once you mark someone as being a priority creature, their messages will always appear above all others within your conversation section. Their profile photo will show up as its own separate icon within your status bar, too. And you’ll have the ability to tap a new icon within their message notifications to pop the entire thread out into its own floating window. At that point, the thread will appear on top of whatever else you’re doing and can be collapsed down into a small circular icon for easy ongoing access.
 JR
JRAnd this isn’t limited only to missives from Google’s own Messages app, either, by the way. It works with any messaging app that’s properly coded to support it.
So think carefully about which of your associates and/or nemeses deserve priority status — a boss, an important client, a pet ferret, or whatever the case may be — and start marking ’em accordingly. Just press and hold your finger to the next notification that comes in from that contact, then tap the “Priority” option and select “Apply.”
All that’s left is to sit back, relax, and enjoy your freshly added messaging efficiency.
Android 11 adjustment no. 3: Improve the new media player
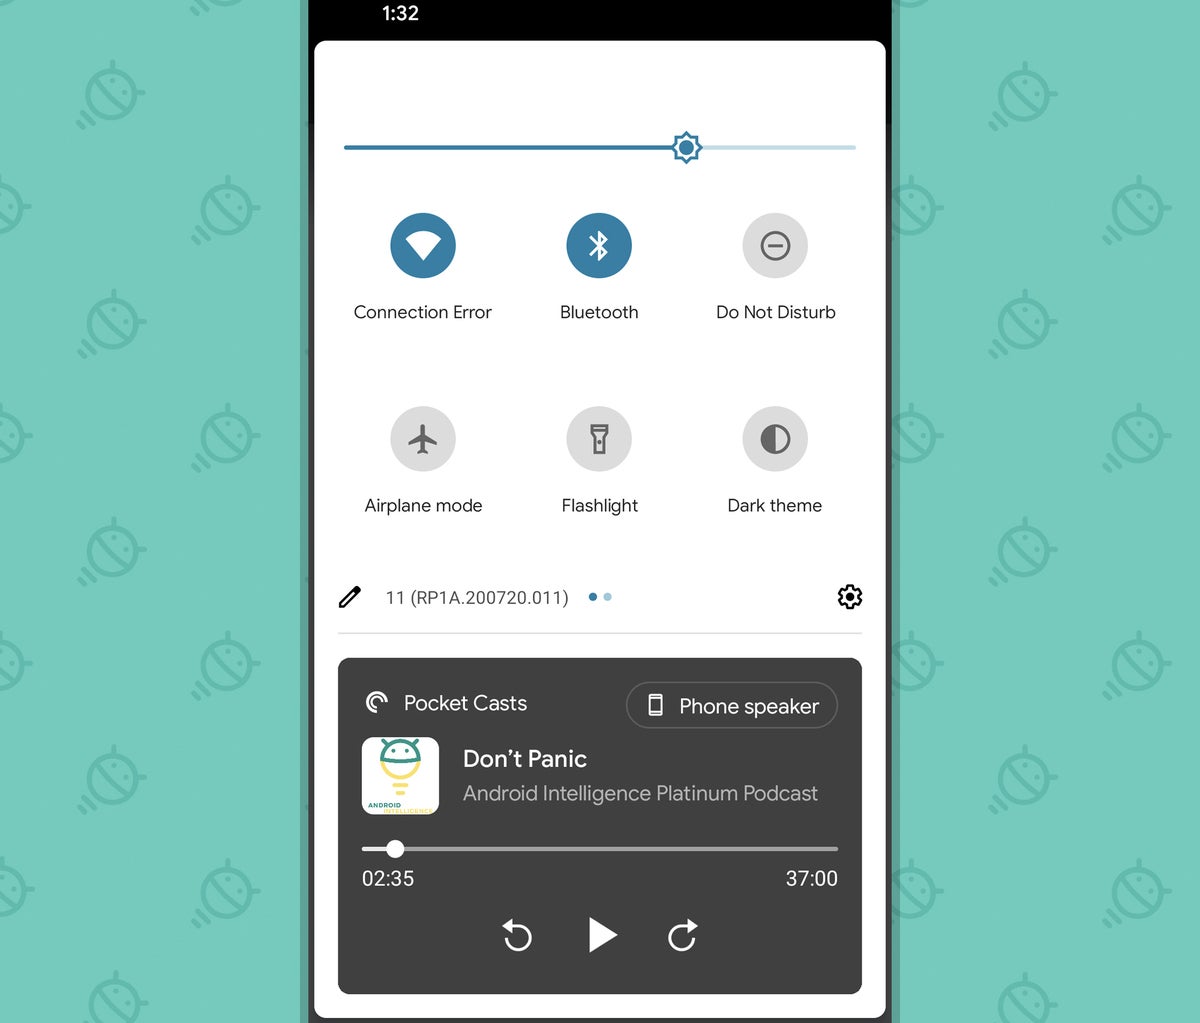
This latest Android update does away with the numerous notification-based media players of Android versions past and instead gives you a single streamlined media player for all audio and video played from your phone. No matter what app the sights and/or sounds come from, you’ll see controls in the same stationary player at the top of your Quick Settings — and if you’ve had multiple apps playing media lately, you’ll be able to move between ’em by swiping left or right on that area.
 JR
JRIt’s handy — but by default, the player tends to stick around indefinitely and overstay its welcome. Even long after you’ve stopped listening to something, you’ll see a player for it in that fully expanded Quick Settings area of your phone. And oftentimes, it’s difficult or impossible to dismiss.
I don’t know about you, but that kind of persistent clutter drives me crazy. So here’s the better way: Open up the Sound section of your system settings, tap “Media,” and then activate the toggle next to “Hide player when the media session has ended.” Then, when any given media session ends, its player will automatically go away on its own — leaving you with a tidier, less clutter-filled space for taking care of business.
Android 11 adjustment no. 4: Reveal the new screen recorder
At long last, Google has added a native screen recorder into Android. (Hooray!) But when you first get the Android 11 upgrade, you’ll probably never even realize it’s there. (Awww.)
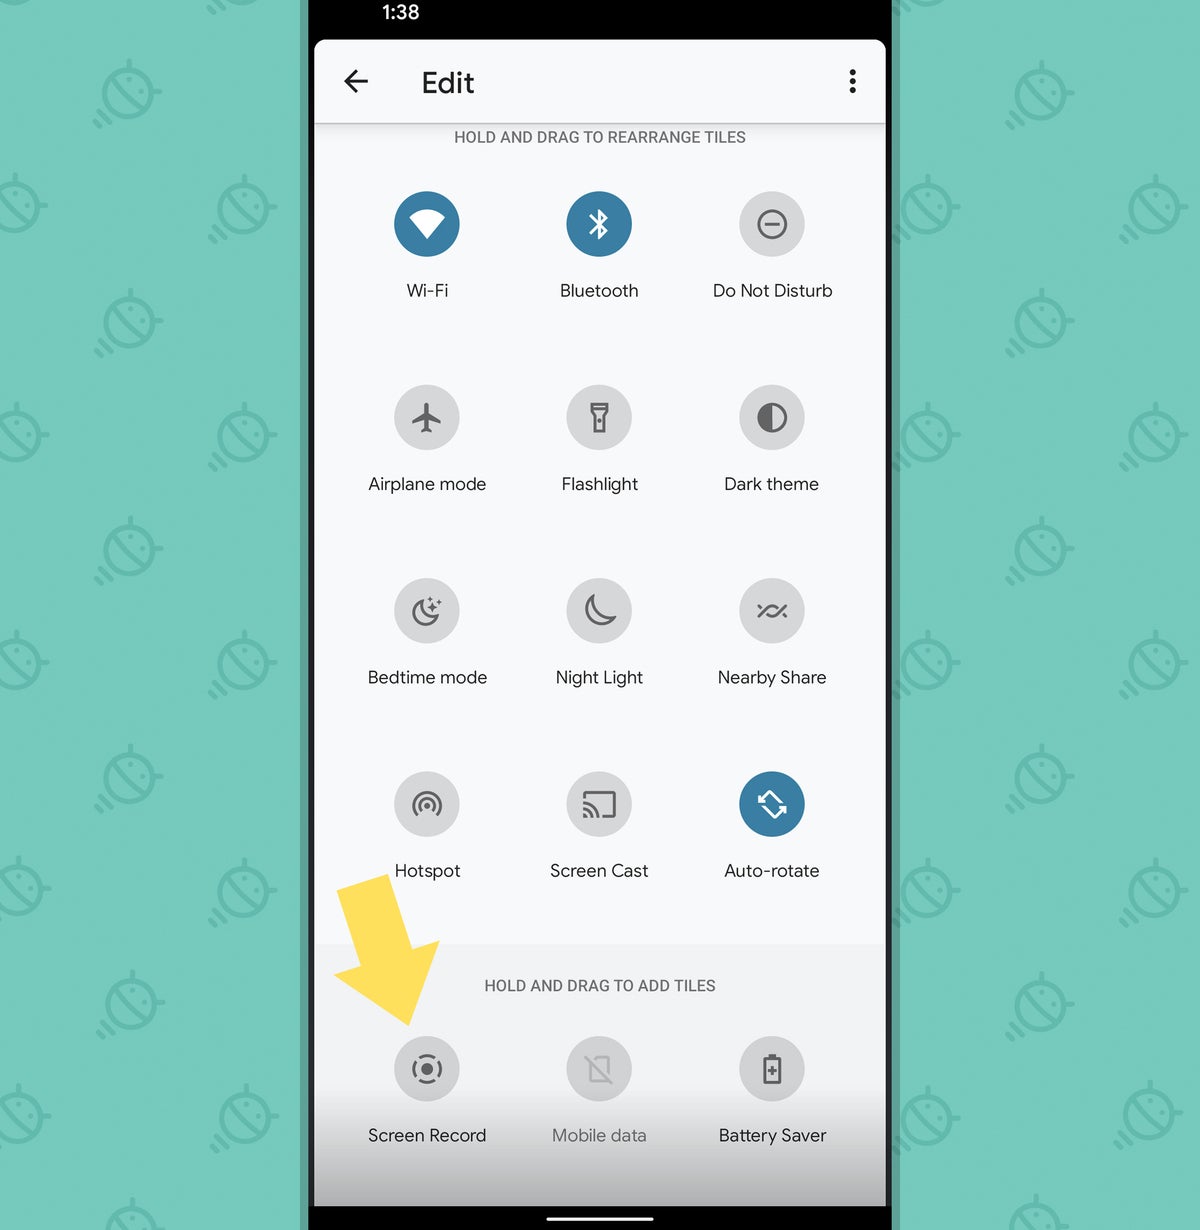
But wait! It’s incredibly easy to find (hooray!) — and once you bring it out of hiding, it’ll always be nearby and waiting for you to use it (double-hooray!). Just open up your Quick Settings panel by swiping down twice from the top of your screen, then tap the pencil-shaped icon in the lower-left corner of the screen to edit its contents.
Scroll down ’til you come to the inactive area of the lineup. See that shy little monkey hiding down there?
 JR
JRTouch and hold your finger to it and drag it up to the active area of your Quick Settings panel — and then, well, wouldya look at that?
There it is, ready for tapping. (One more time, together: Hooray!)
Android 11 adjustment no. 5: Prune your permissions
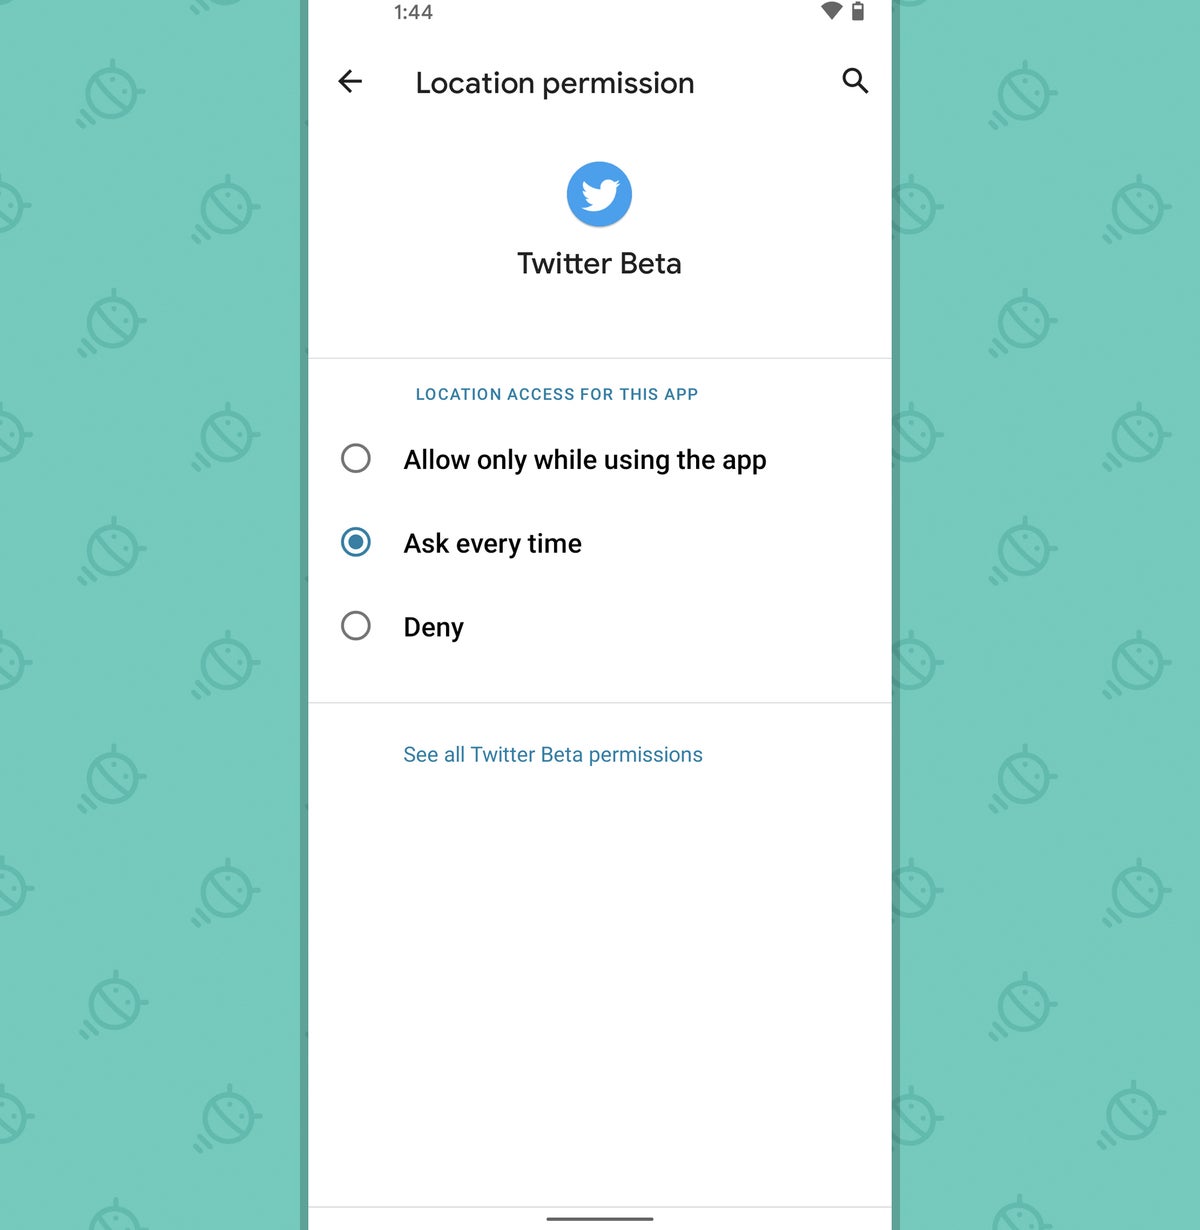
Android 11 introduces the ability to approve an app to access your location, camera, or microphone only once — on a limited, one-time basis. Smart, right? Of course right!
But here’s the catch: By the time you get the Android 11 upgrade, you’ll probably have already granted tons of apps full, unrestricted access to those same areas of your device — since the one-time-use option wasn’t around when you first installed and used ’em. So now’s the time to go back through your existing apps and think about which really need that everlasting access and which would be better off getting it only on a more limited, as-needed basis — and then to make any adjustments as needed.
It isn’t difficult to do: Just head into the Privacy section of your system settings, tap “Permission manager,” and then look closely at the “Location,” “Camera,” and “Microphone” areas. When you encounter an app in the “Allowed” category for any of those areas that you think would be better suited to have access granted only as needed, tap its title and change its setting to “Ask every time.”
 JR
JRAndroid 11 will always prompt you to make the decision on the fly for any new permission requests that come up for location, camera, or microphone access, but this initial audit of already-granted permissions is up to you to make.
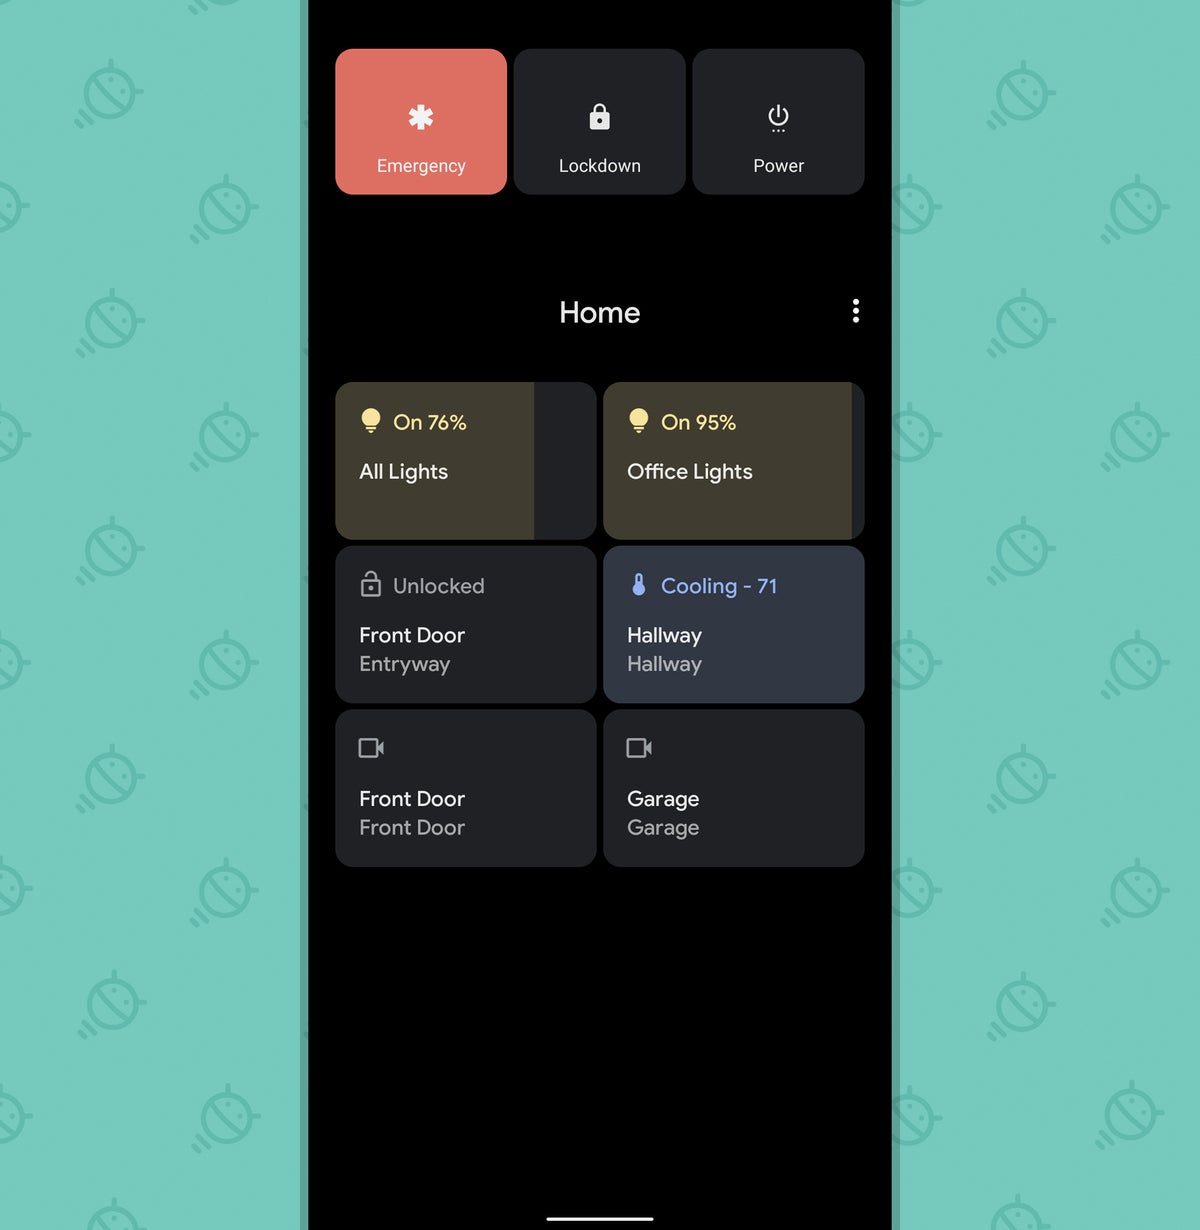
Android 11 adjustment no. 6: Optimize your new power menu
Pressing and holding your phone’s power button in Android 11 pulls up a whole new menu of smart-device controls — everything from internet-connected lights and thermostats in your home office to cameras in your house that you check in on during the day. By default, though, it’s probably gonna be a bit messy and anything but optimized for your needs.
So press and hold your power button for a sec and then see what you’ve got going on there. If you see any tiles you want to remove — or any missing ones you’d like to add in — tap the three-dot menu icon in the upper-left area of the screen and select either “Add controls” or “Edit controls.”
And if you find the oversized presence of your Google-Pay-connected credit card on that screen to be an annoying waste of space — which it generally is, if you ask me, unless you keep multiple credit cards connected to that system and need to flip through ’em regularly — head into the System section of your system settings, tap “Gestures,” and then tap “Power menu” followed by “Cards & passes” and turn the toggle on that screen into the off position.
 JR
JRAhh — much better, wouldn’t ya say?
Android 11 adjustment no. 7: Automate your darkness
Last but not least is a subtle adjustment but an important one. Android 10, y’see, brought us a new switch for activating a system-wide dark mode. It’s a lovely option to have, especially when you’re staring at your screen in dim environments such as darkened offices or empty zoo enclosures. But unless you just really love having a dark motif activated at all times of day and night, it requires you to remember to flip the thing on and off as needed — and if your brain is anything like mine, that’s probably something you fail to do more often than not.
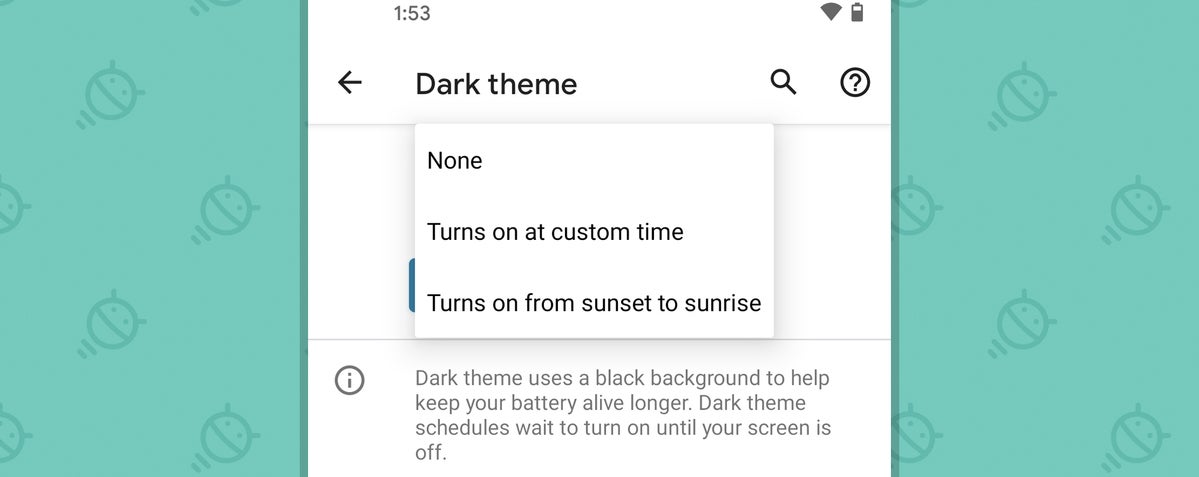
Well, Android 11 addresses that little oversight with a welcome new dark mode scheduling option. Just prance into the Display section of your system settings, tap “Dark Theme” and then tap “Schedule.” And lookie what we have here…
 JR
JRYou can set your system dark mode to turn itself on and off automatically with the sunset and sunrise or opt for a specific time-based schedule to activate and deactivate it, if you’d rather.
If you really want to make your phone optimized for your eyes, visit the “Night Light” section of that same area of your settings next and set it to follow the same schedule. That’ll put your display into a tinted and darkened state during the evening hours and back into a brighter, lighter motif during the day, without any ongoing thought or action.
Maximum effectiveness with minimal effort — it doesn’t get much better than that.
Sign up for my weekly newsletter to get more practical tips, personal recommendations, and plain-English perspective on the news that matters.
