


There has been some concern that Windows 10 gathers too much private information from users. Whether you think Microsoft’s operating system crosses the privacy line or just want to make sure you protect as much of your personal life as possible, we’re here to help. Here’s how to protect your privacy in just a few minutes.
Note: This story has been updated for the Windows 10 May 2020 Update, version 2004. If you have an earlier release of Windows 10, some things may be different.
Turn off ad tracking
At the top of many people’s privacy concerns is what data is being gathered about them as they browse the web. That information creates a profile of a person’s interests that is used by a variety of companies to target ads. Windows 10 does this with the use of an advertising ID. The ID doesn’t just gather information about you when you browse the web, but also when you use Windows 10 apps.
You can turn that advertising ID off if you want. Launch the Windows 10 Settings app (by clicking on the Start button at the lower left corner of your screen and then clicking the Settings icon, which looks like a gear) and go to Privacy > General. There you’ll see a list of choices under the title “Change privacy options”; the first controls the advertising ID. Move the slider from On to Off. You’ll still get ads delivered to you, but they’ll be generic ones rather than targeted ones, and your interests won’t be tracked.
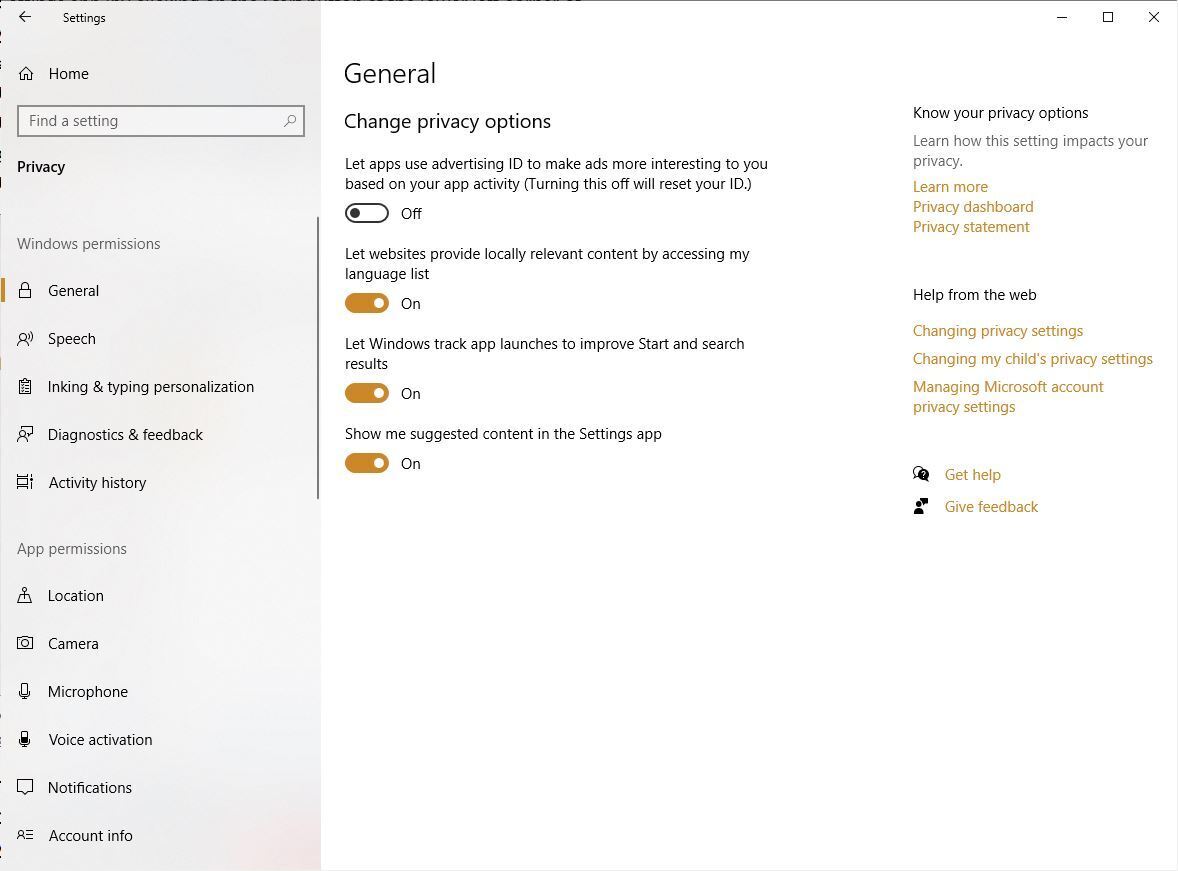 IDG
IDGYou can turn off Windows 10’s advertising ID if you want. You’ll still get ads, but they’ll be generic ones. (Click any image in this story to enlarge it.)
To make absolutely sure you’re not tracked online when you use Windows 10, and to turn off any other ways Microsoft will use information about you to target ads, head to the Ad Settings section of Microsoft’s Privacy Dashboard. Sign into your Microsoft account toward the top of the page.
Then go to the “See ads that interest you” section at the top of the page and move the slider from On to Off. After that, scroll down to the “See personalized ads in your browser” section and move the slider from On to Off. Note that you need to go to every browser you use and make sure the slider for “See personalized ads in your browser” is set to Off.
Turn off location tracking
Wherever you go, Windows 10 knows you’re there. Some people don’t mind this, because it helps the operating system give you relevant information, such as your local weather, what restaurants are nearby and so on. But if you don’t want Windows 10 to track your location, you can tell it to stop.
Launch the Settings app and go to Privacy > Location. Underneath “Allow access to location on this device,” click Change and, on the screen that appears, move the slider from On to Off. Doing that turns off all location tracking for every user on the PC.
If you click the Change button, you can turn off location tracking for every user on the Windows 10 device.
This doesn’t have to be all-or-nothing affair — you can turn off location tracking on an app-by-app basis. If you want your location to be used only for some apps and not others, make sure location tracking is turned on, then scroll down to the “Choose apps that can use your precise location” section. You’ll see a list of every app that can use your location. Move the slider to On for the apps you want to allow to use your location — for example, Weather or Microsoft News — and to Off for the apps you don’t.
When you turn off location tracking, Windows 10 will still keep a record of your past location history. To clear your location history, go to the Privacy Dashboard, scroll down to the Location Activity section, click View and Clear Location Activity, and delete all or some of your location history.
There’s a lot more you can do to protect your privacy when you’re there. For details, see “Use Microsoft’s Privacy Dashboard” below.
Turn off Timeline
Timeline lets you review and then resume activities and open files you’ve started on your Windows 10 PC, as well as any other Windows PCs and devices you have. So, for example, you’ll be able to switch between a desktop and laptop and from each machine resume activities you’ve started on either PC.
In order to do that, Windows needs to gather information about all your activities on each of your machines. If that worries you, it’s easy to turn Timeline off. To do it, go to Settings > Privacy > Activity History and uncheck the boxes next to Store my activity history on this device and Send my activity history to Microsoft.
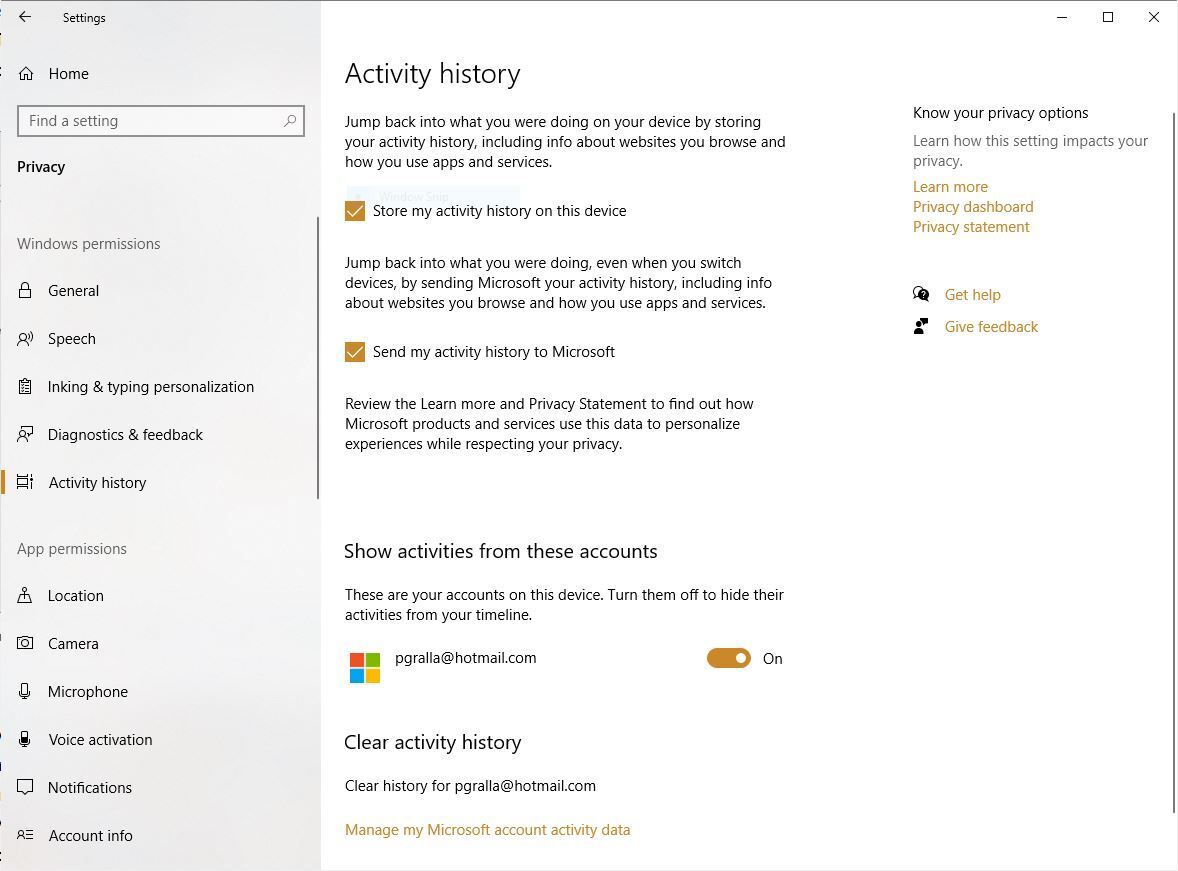 IDG
IDGHere’s how to turn off Timeline so that Microsoft doesn’t gather information about your activities on your PC.
At that point, Windows 10 no longer gathers information about your activities. However, it still keeps information about your old activities and shows them in your Timeline on all your PCs. To get rid of that old information, in the “Clear activity history” section of the screen, click Manage my Microsoft account activity data. You’ll be sent to Microsoft’s Privacy Dashboard, where you can clear your data. See the section later in this article on how to use the privacy dashboard to do that.
Note that you’ll have to take these steps on all of your PCs to turn off the tracking of your activities.
Curb Cortana
Cortana is a somewhat useful digital assistant, but there’s a tradeoff in using it: To do its job well, it needs to know things about you such as your home location, place of work, and the times and route you take to commute there. If you’re worried it will invade your privacy by doing that, there are a few things you can do to limit the information Cortana gathers about you. But there’s some information you’ll have to share with Cortana if you want to use the assistant at all.
Start by opening Cortana settings: Click the Cortana icon to the right of the Windows search box (it’s a circle), then click the three-dot icon in the upper left of the screen and select the settings icon that appears in the pane. A panel appears that lets you, to a limited extent, limit the information Cortana gathers about you.
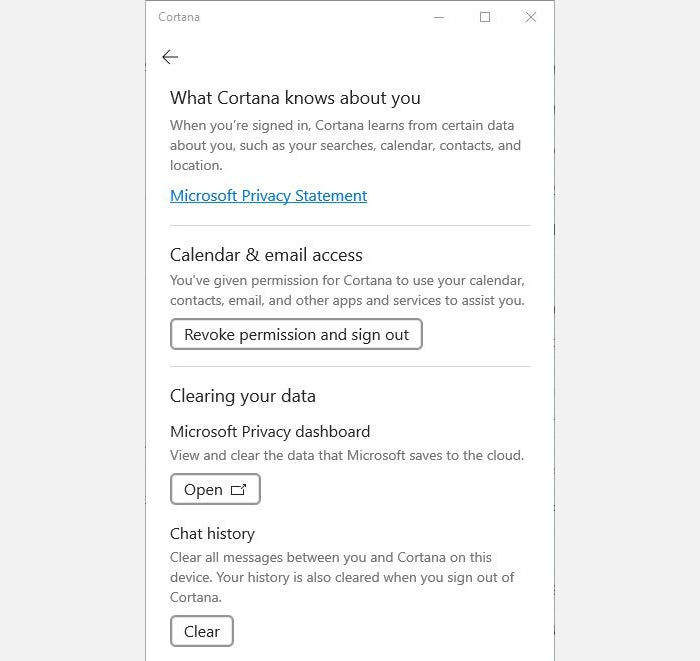 IDG
IDGHere’s the central location for handling privacy in Cortana, but there’s not a lot you can do to limit its privacy gathering if you want to continue to use it.
Click Revoke permission and sign out, and you’ll be signed out of Cortana, your chat history will be cleared, and Cortana won’t track information such as your location or connect with your calendar, email, contacts and other apps and services. But you won’t be able to use Cortana, either. The next time you sign in, Cortana will once against track you and connect with all those services.
If you only want to clear your chat history but remain signed into Cortana, click Clear in the chat history section. Your chat history will be deleted, but once you start using Cortana, you’ll once again build up a chat history.
To clear other information from Cortana, click Open in the “Clearing your data” section. That will bring you to the Privacy Dashboard. Scroll down to “Cortana’s Notebook” and click Edit Cortana Data. If you want to delete the data Cortana has gathered about you, click Clear Cortana data on the right side of the screen. That will clear your current data, but Cortana will begin to collect it again once you start using it.
 IDG
IDGHere’s how to delete all the information Cortana has gathered about you.
One note about the entire Cortana section of the Privacy Dashboard: Other than clearing your data, it’s outdated and useless unless you use an older version of Windows 10. It controls privacy details and data associated with Cortana’s old Notebook feature, which no longer exists in Windows 10 2004.
Ditch a Microsoft account for a local account
When you use your Microsoft account to log into Windows 10, you’re able to sync your settings with all Windows devices. So, for example, when you make changes to your settings on a desktop PC, those changes will also be made on your laptop the next time you log in.
But maybe you don’t want Microsoft to store that information about you. And maybe you want to cut your ties as much as possible to anything Microsoft stores about you. If that’s the case, your best bet is to stop using your Microsoft account and instead use a local account.
It’s simple to do. Go to Settings > Accounts and select Sign in with a local account instead. A wizard launches. Follow its instructions to create and use a local account. Keep in mind that when you do this, you won’t be able to use Microsoft’s OneDrive storage or download and install for-pay apps from the Microsoft Store. You can, however, download and install free apps from the Microsoft Store.
Change your app permissions
Windows apps have the potential to invade your privacy — they can have access to your camera, microphone, location, pictures and videos.
But you can decide, in a very granular way, what kind of access each app can have.
To do this, go to Settings > Apps. Below “Apps & features” you’ll see a list of your installed apps. Click the app whose permissions you want to control, then click Advanced options and set the app’s permissions by toggling them either on or off.
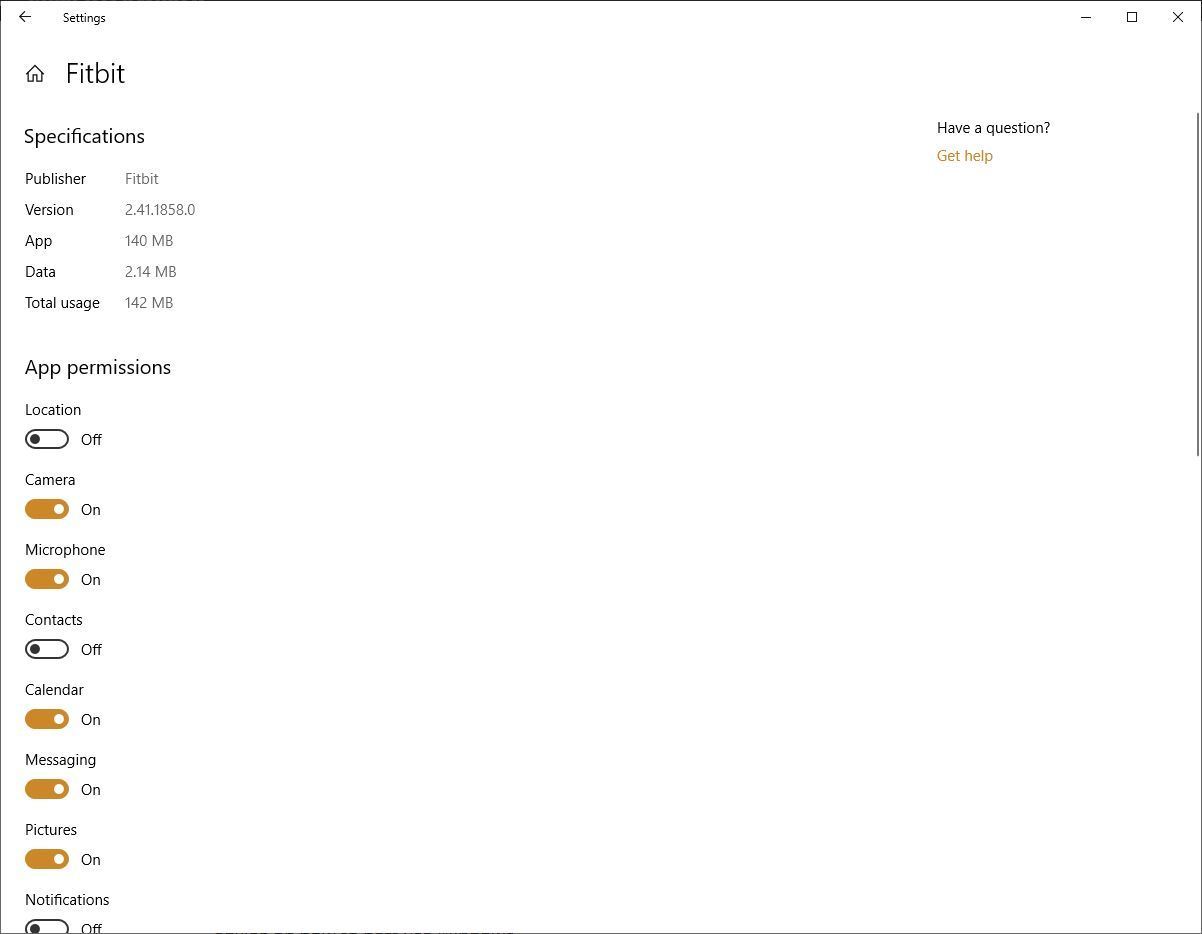 IDG
IDGSetting permissions for the Fitbit app.
Note, though, that very few apps have an “Advanced options” link. And of those that do, not all let you customize your app permissions.
However, there’s another way to change app permissions. To do it, go to Settings > Privacy and look under the “App permissions” section on the left-hand side of the page. You’ll see a list of all of Windows’ hardware, capabilities and features that apps can access if they’re given permission — location, camera, microphone, notifications, account info, contacts and so on.
Click any of the listed items — for example, Microphone. At the top of the page that appears, you can turn off access to the microphone for all apps. Below that you’ll see a listing of all the apps with access to the microphone, where you can control access on an app-by-app basis. Any app with access has a slider that is set to On. To stop any app from having access, move the slider to Off.
Control and delete diagnostic data
As you use Windows 10, data is gathered about your hardware and what you do when you use Windows. Microsoft says that it collects this data as a way to continually improve Windows and to offer you customized advice on how to best use Windows.
That makes plenty of people uncomfortable. If you’re one of them, you can to a certain extent control what kind of diagnostic data is gathered about you. To do it, head to Settings > Privacy > Diagnostics & Feedback. In the “Diagnostic data” section, you can choose between two levels of diagnostic data to be gathered. Note that there’s no way to stop Microsoft from gathering diagnostic data entirely. Here are your two choices:
- Required diagnostic data: This sends information to Microsoft “about your device, its settings and capabilities, and whether it is performing properly.” If you’re worried about your privacy, this is the setting to choose.
- Optional diagnostic data: This sends the whole nine yards to Microsoft: It will send info about the websites you browse and how you use apps and features, plus additional info about device health, device usage, and enhanced error reporting.” It also sends along required diagnostic data. If you’re worried about your privacy, don’t make this choice.
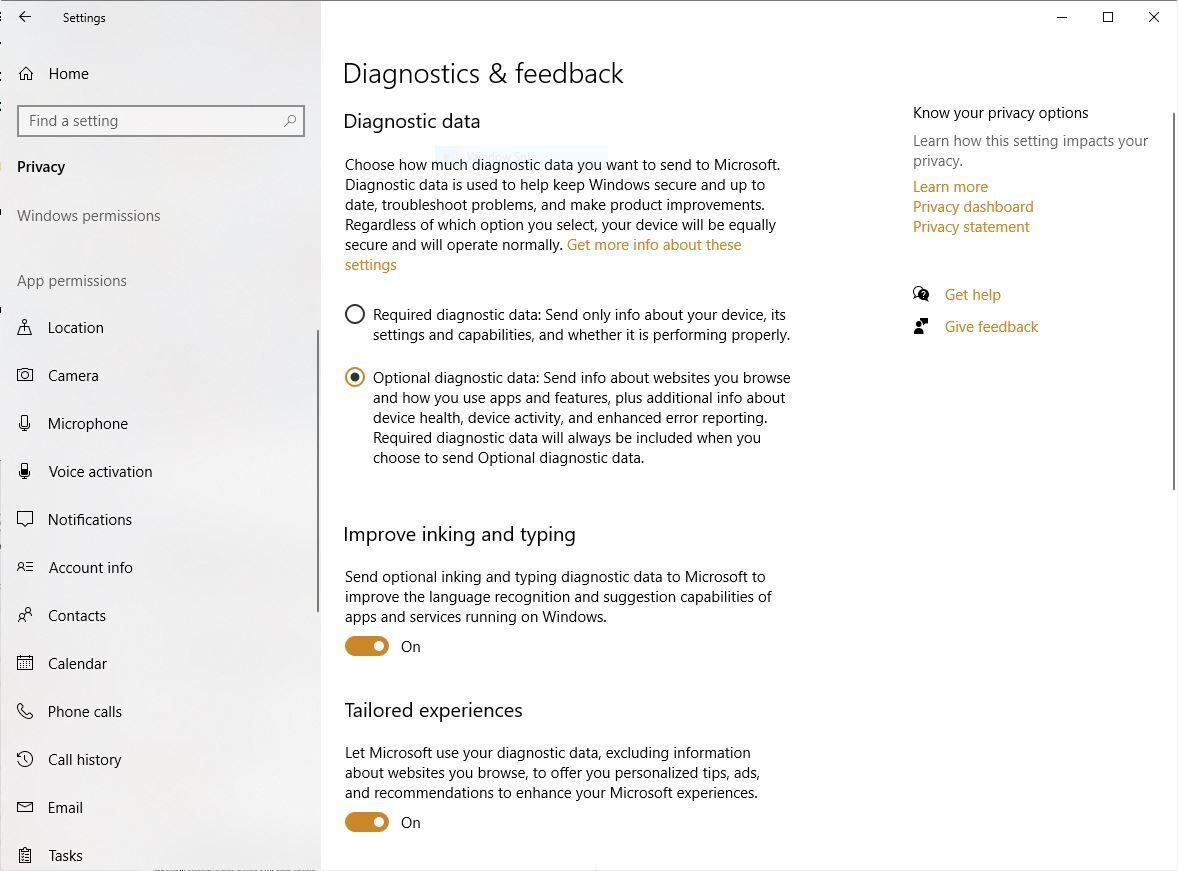 IDG
IDGGo here to control what diagnostic data Windows 10 gathers.
Next, scroll down to the “Tailored experiences” section and move the slider to Off. This won’t affect the data Microsoft gathers, but it will turn off targeted ads and tips that are based on that information. So while it won’t enhance your privacy, you’ll at least cut down on the annoyance factor.
Now scroll a bit further down and in the “Delete diagnostic data” section, click Delete. That will delete all the diagnostic data Microsoft has gathered about you. However, after you delete it, Microsoft will start gathering the data again.
Finally on this screen, consider scrolling up to the “Improve inking & typing recognition” section and moving the slider to Off. That will stop Windows 10 from sending to Microsoft the words you input using the keyboard and inking.
One final note about diagnostic data. You may have heard about a tool Microsoft has been hyping, called the Diagnostic Data Viewer, which you can download from the Microsoft Store. Microsoft claims it lets you see exactly what kind of diagnostic data Microsoft gathers about you. Don’t believe it. It’s something only a programmer could love — or understand. You won’t be able to use it to clearly see the diagnostic data Microsoft collects. Instead, you’ll scroll or search through incomprehensible headings such as “TelClientSynthetic.PdcNetworkActivation_4” and “Microsoft.Windows.App.Browser.IEFrameProcessAttached” with no explanation of what it means. Click any heading, and you’ll find even more incomprehensible data.
Use Microsoft’s Privacy Dashboard
Microsoft has built an excellent, little-known web tool called the Privacy Dashboard that lets you track and delete a lot of information Microsoft gathers about you. To get to it, go to https://account.microsoft.com/privacy/.
As covered earlier in this story, here you can turn off ad targeting and delete data gathered by Cortana. You can also view and delete your browsing history, search history, location activity, voice activity, media activity, LinkedIn activity, and a lot more.
(Note that for your browsing and search history, it only tracks your activity when you use Microsoft Edge or Internet Explorer. It doesn’t track data when you use other browsers, like Chrome or Firefox. And it only tracks your location history when you’re using Microsoft devices, not those that use iOS or Android.)
 IDG
IDGMicrosoft’s little-known Privacy Dashboard is a great place to delete much of the information Microsoft gathers about you.
Using it is a breeze. Simply head to the information you want to view and clear, then click the “View and Clear…” button. You’ll see all your activity in that category, and be able to delete individual instances (such as a single web search, for example), or all of it at once.
Get granular in the Settings app
All this shouldn’t take that long and will do a great deal to protect your privacy. However, if you want to dig even deeper into privacy protections, there’s something else you can do.
Launch the Settings app and click Privacy. On the left-hand side of the screen, you’ll see the various areas where you can get even more granular about privacy — for example, in the Windows permissions section you can change your global privacy options for things such as speech recognition and inking. And here’s where you’ll get access to all app permissions, as outlined earlier in this article.
These steps can take you a long way towards making sure that Windows 10 doesn’t cross the line into gathering data you’d prefer remain private.
This article was originally published in January 2016 and most recently updated in September 2020.