


A new Android version is intriguing, exciting, and — let’s be honest — sometimes a little perplexing. Especially nowadays, it’s all too common to see a shiny new update show up on your phone, eagerly look to see what fresh treats are in store, and then find yourself scratching your head as you struggle to see what’s different and how you should be taking advantage of whatever was delivered to your device.
There’s no denying it: Android’s evolution has grown significantly more subtle over the years. Whereas early Android updates represented massive leaps forward and near-constant reinventions of the operating system, more modern Android rollouts tend to revolve mostly around refinement and small but significant touches. It’s a sensible shift at this point in the platform’s development, but it often makes it tough to know if you’re tapping into everything Google’s latest software provides.
And Android 11 is certainly no exception. The latest Android release is chock-full of important additions, but many of them are under the hood and not immediately obvious. And even the ones that are on the surface require a teensy bit of tweaking to be brought to their full potential.
Whether you just got Android 11 recently or have had it since its formal release last September, the tips on this page will help you unlock all of the software’s practical value. The magic’s already all there and waiting; it’s just up to you to seek it out and embrace it.
If you’re among the many non-Google-phone owners still waiting for the software to reach you, hang onto this guide for the future — and check out my separate story on bringing Android-11-like features onto any phone today for some clever ways to give yourself similar elements in the meantime.
(Note that the features and steps described below are all relevant to Google’s original Android 11 software, which is present on Pixel phones, Android One devices, and certain other products. Some Android phone-makers modify the operating system and even occasionally omit features for no apparent reason — so if you’re using a device that doesn’t stick with Google’s default Android arrangement, some of the elements mentioned here may be different or in a few cases entirely absent on your phone.)
Privacy protection
1. The most consequential addition in Android 11, especially from a business perspective, is the elevated set of tools the software gives you for privacy protection — so don’t let that go to waste!
The first and most important thing you’ll want to take advantage of is the software’s more nuanced controls for camera, location, and microphone permissions. As of Android 11, you can grant apps access to those areas on a limited, single-session basis — meaning the permissions will expire and have to be requested anew as soon as you exit the app and move on to something else.
But, critically, any apps that were on your phone before the Android 11 upgrade will already have permanent permissions granted — so it’s up to you to go back and reassess ’em as needed.
To do so, open up the Privacy section of your system settings and tap “Permission manager.” One by one, look through the categories for “Camera,” “Location,” and “Microphone.” If you see any approved permissions that you’d rather have handled on a case-by-case basis, tap the associated app’s line and then change its setting to “Ask every time.”
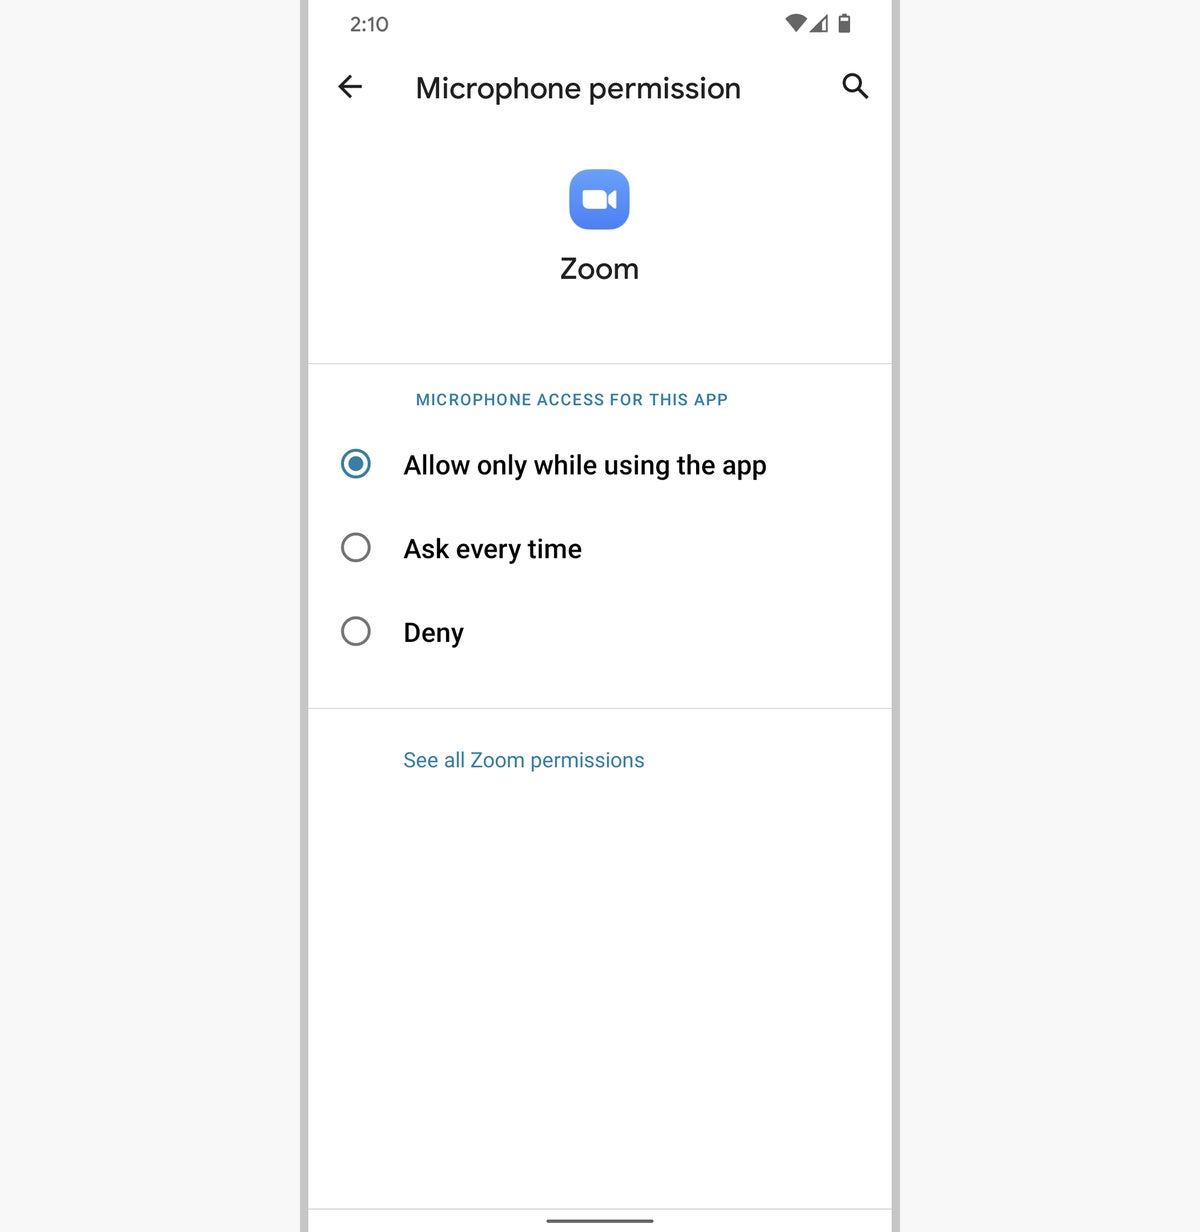 JR Raphael/IDG
Android 11’s new short-term permissions can better protect your data, but it’s often up to you to find and take advantage of them.
With any apps you install from this point forward, the prompt to make that decision will come up automatically the first time the app requests one of the relevant permissions — so it’s only with existing apps that you need to perform this one-time assessment.
2. The other Android 11 privacy feature that requires your action is the software’s ability to automatically revoke sensitive permissions from apps that you haven’t opened or otherwise used in a matter of months. Oddly, that capability isn’t always on by default — so head into the Apps (or Apps & Notifications) section of your system settings, tap the line to see all of your apps, if needed, and then tap the name of any app where you’d like that behavior to occur.
Next, you’ll want to tap “Permissions” and look for a line labeled “Remove permissions if app isn’t used.” Activate the toggle next to it, and then rest easy knowing that the doors to your sensitive info will automatically close if the app in question ever gets forgotten.
Next-level notifications
3. Notifications get a nice upgrade with a new dedicated “Conversations” section in Android 11, and you can take control of how exactly it works. Anytime you receive a message within an app that supports the feature, just press and hold the notification to reveal a new option that’ll set it as a priority conversation — which causes its notification to appear at the top of the “Conversations” section, with the sender’s profile photo as its own standalone icon in your status bar area, and optionally even with an expandable bubble you can use to keep the conversation readily available no matter what else you’re doing.
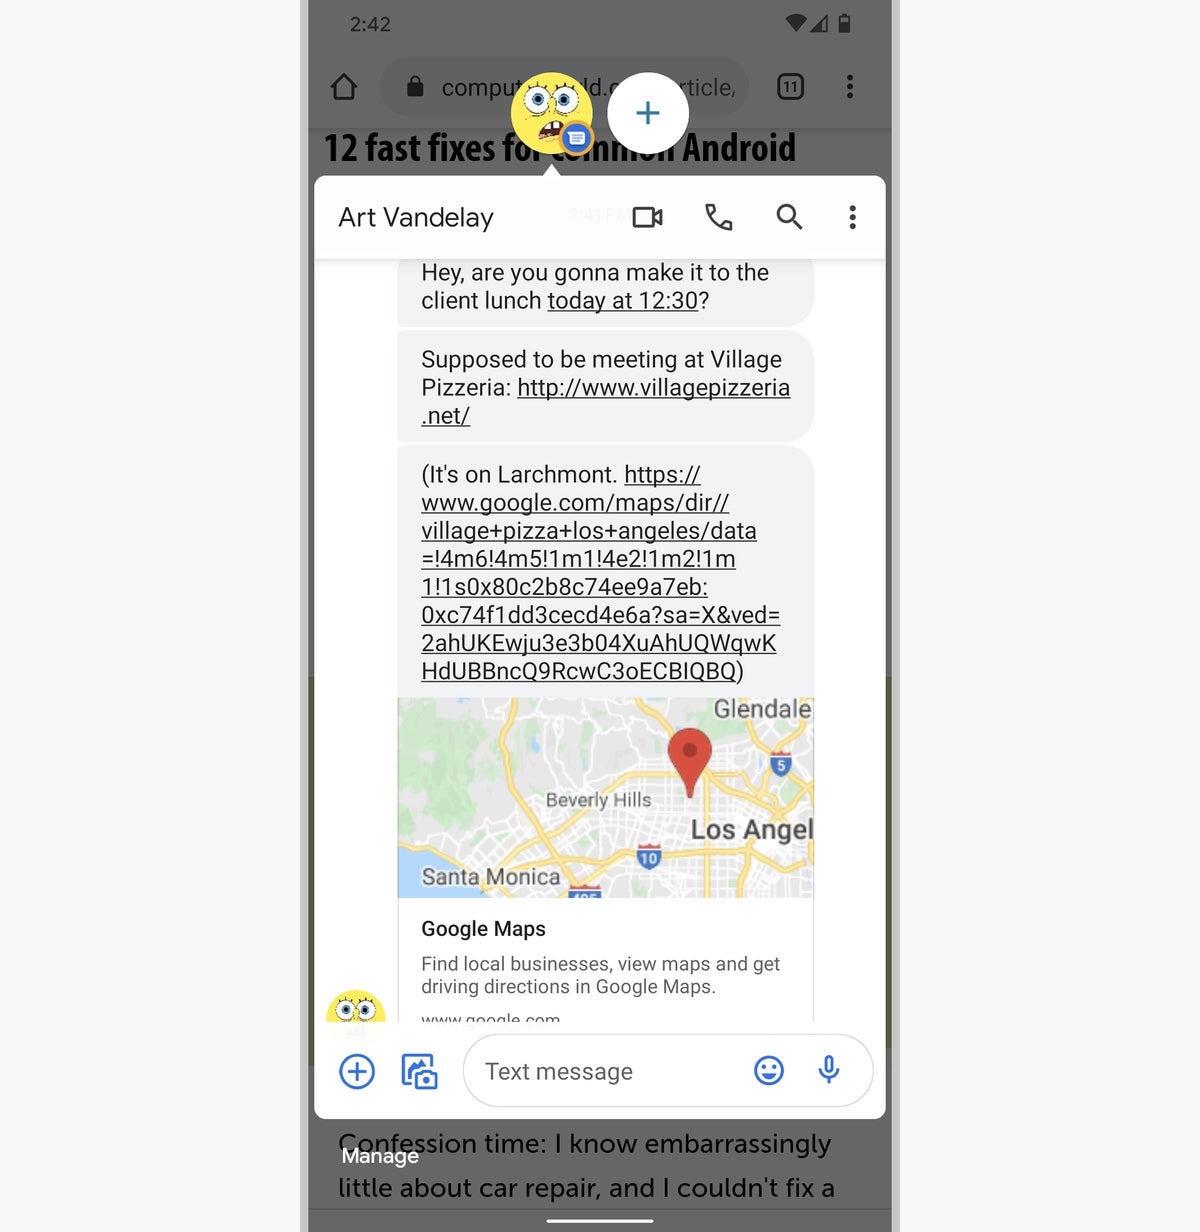 JR Raphael/IDG
You can pop important messages out into expandable bubbles for easy ongoing access, thanks to Android 11’s new “Conversations” controls.
4. You can actually turn any compatible messaging thread into a bubble, too, regardless of whether it’s set as a priority-level conversation. Just look in the Apps (or Apps & Notifications) section of your system settings and find the new “Conversations” option, then tap the line corresponding to the conversation you want to bring into the bubble interface.
That’ll pull up a settings screen on which you can opt to have the conversation always appear within that persistent bubble, regardless of its status.
5. That same conversation-specific settings screen holds another option worth remembering: the option to pull a specific messaging thread out of the “Conversations” section altogether so that it appears as a regular, less emphasized notification.
6. Ever find yourself wishing you could bring back a notification you inadvertently swiped away? Android 11 has the solution with its new Notification History feature. Make sure to enable it by going into the Apps (or Apps & Notifications) section of your system settings, then tapping “Notifications” followed by “Notification history.” Flip the toggle at the top of the screen into the on position, and whenever you have at least one notification present, you’ll see a new “History” option that’ll take you to a list of all dismissed alerts from the past 24 hours.
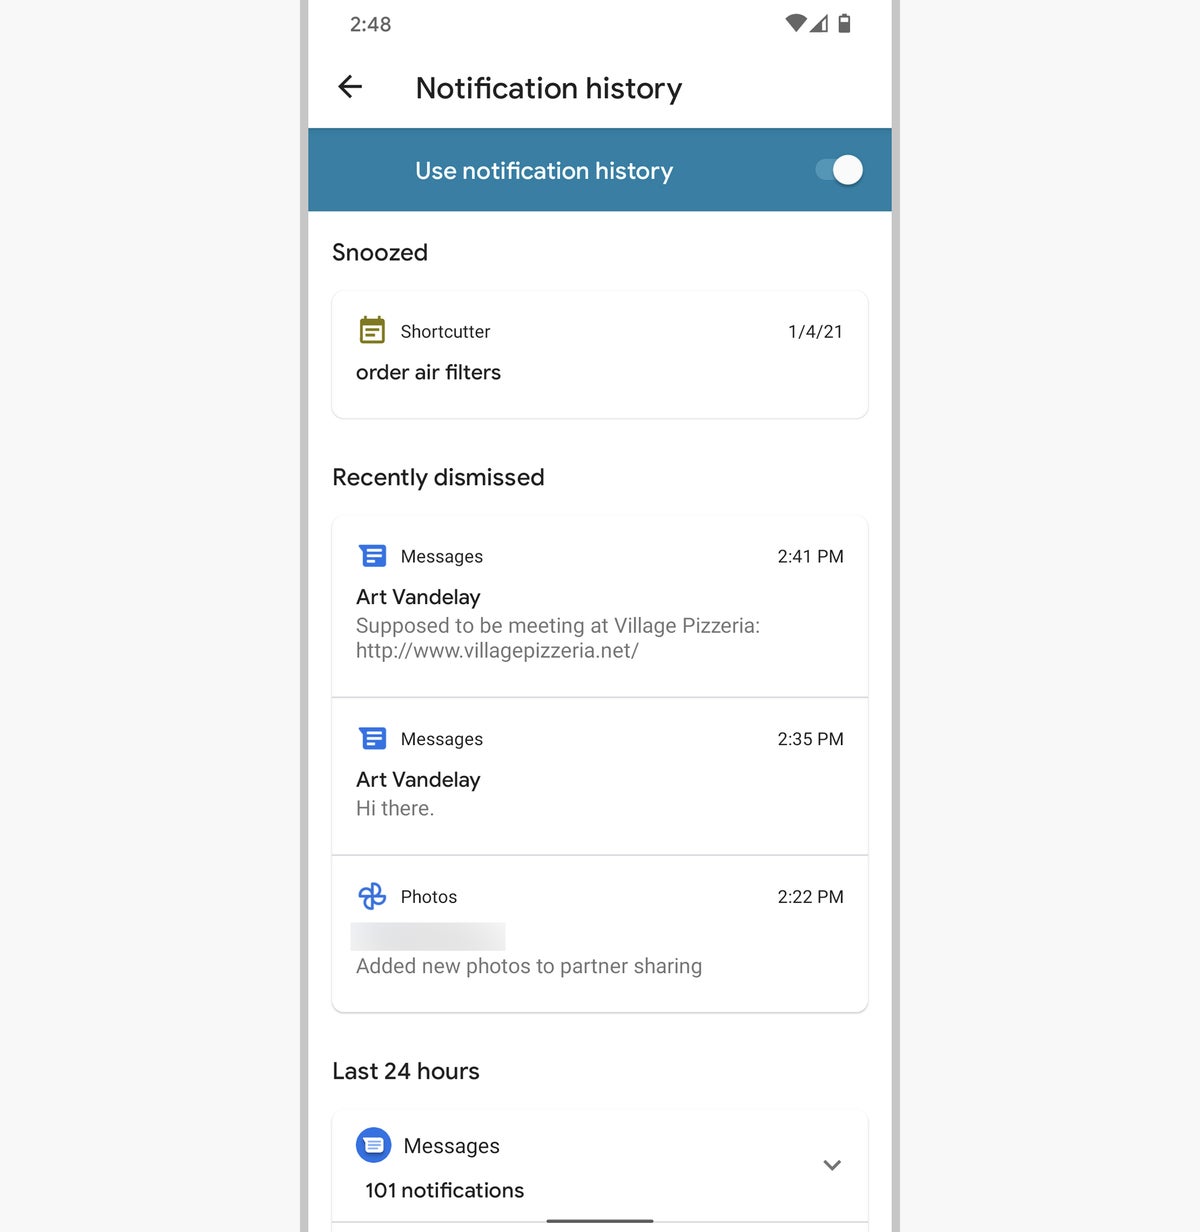 JR Raphael/IDG
Android 11’s new Notification History section is a convenient way to look back at alerts you’ve recently dismissed.
Shortcuts and time-savers
7. Android 11’s most practical new feature, if you ask me, is the connected-device command center it brings into the system power menu — the screen that comes up when you press and hold your phone’s physical power button. Some device-makers, unfortunately, decided to pull this feature out of the operating system before sending it to their customers (hi, Samsung!), but it’s without a doubt a shining highlight of the latest Android software.
So long as you’re using a phone where that element hasn’t been removed, press and hold that newly empowered power button for a second or so, and you’ll see your new best friend pop right up in front of you — complete with controls for any smart lights, cameras, thermostats, or other such products that are set up in your environment and connected to your Google account.
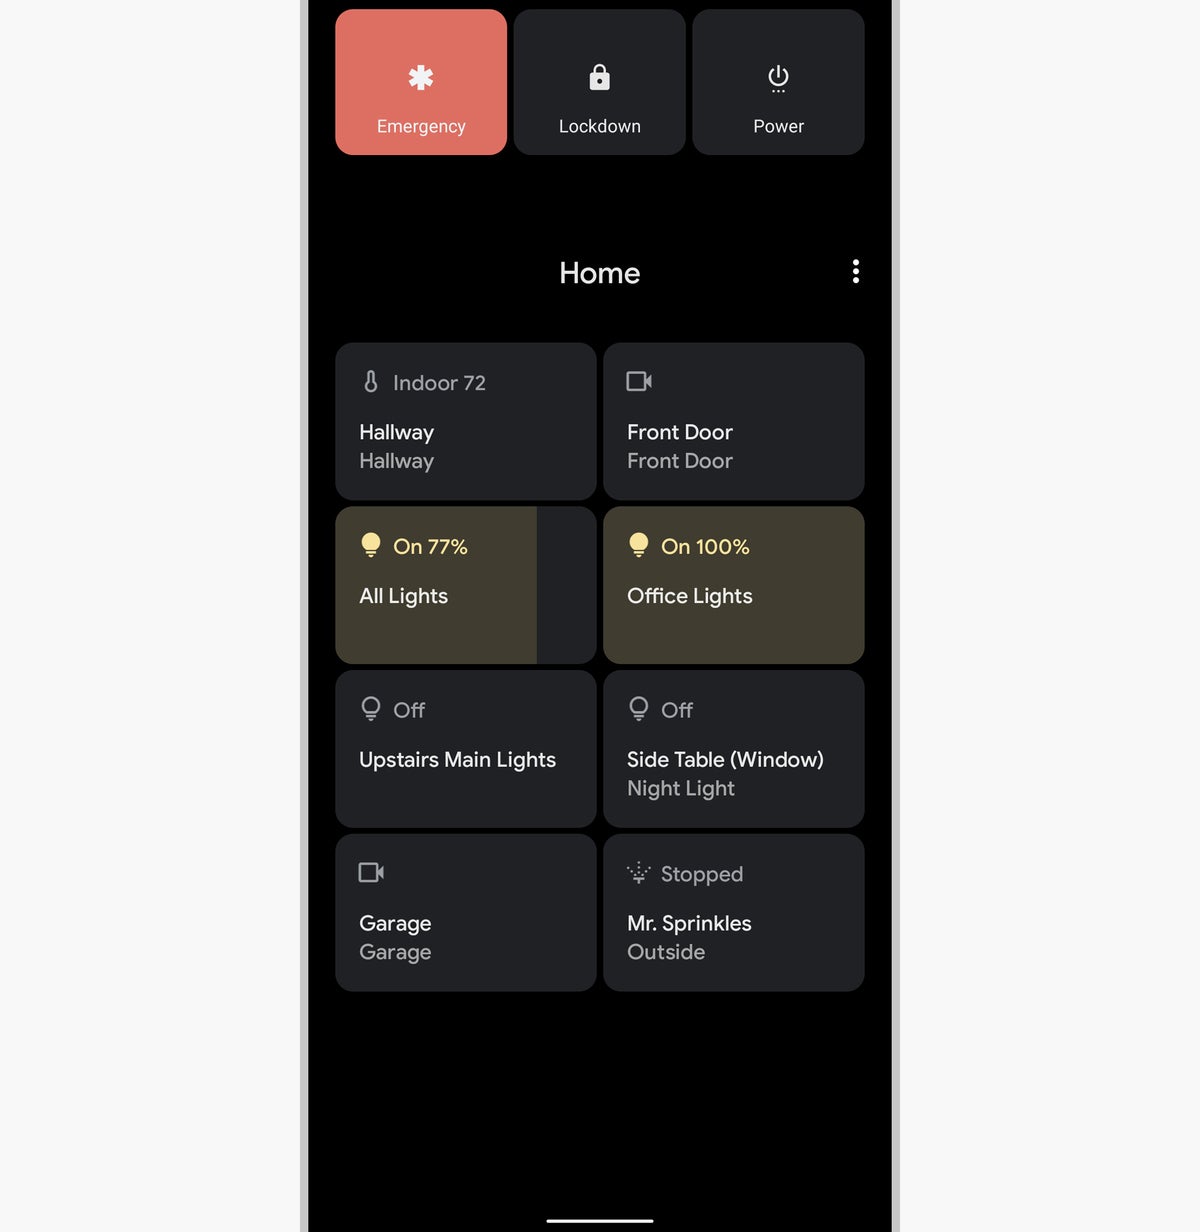 JR Raphael/IDG
The new Android 11 power menu makes it easy to adjust connected devices (and more!) from anywhere on your phone.
8. You’d never know it from looking, but the tiles within that new power button menu can do more than just act as mere on-off toggles. For any tiles where additional options are available, you can also long-press to pull up advanced possibilities in a simple overlay screen.
9. As helpful as it can be, that connected-device command center can also get a little cluttered. If, like me, you find the on-by-default presence of gigantic images showing your Google-Pay-connected credit cards in that area to be of little practical value, head into the System area of your system settings, tap “Gestures,” and then tap “Power menu” followed by “Cards & passes.” (If your phone’s menu structure doesn’t match that, try searching your system settings for power menu to get to a comparable place.)
Turn the toggle on the screen that comes up into the off position, and that Pay-related element of the power menu will be gone for good.
10. In addition to eliminating unnecessary elements from Android 11’s power menu, you can add in new connected-device controls and change the order of the existing controls to put your most frequently accessed items into especially easy-to-reach places. Tap the three-dot menu icon within the power menu and then select either “Add controls” or “Edit controls” to take advantage of either possibility.
11. You don’t have to stop with connected devices, either. With a few minutes of advanced configuration, you can add practically anything into the Android 11 power menu — an always-accessible shortcut to launch Android’s split-screen function, a simple on-screen button for capturing a screenshot of any app, or even a one-tap command for composing a specific prewritten “thank you” email or text message to follow a meeting, for a few interesting examples.
All you need is a powerful Android app called Tasker and about five minutes of crafty configuration to make it happen — and while the initial setup process is a teensy bit complicated, I’ve got an easy-to-follow guide that’ll take you through it step by step.
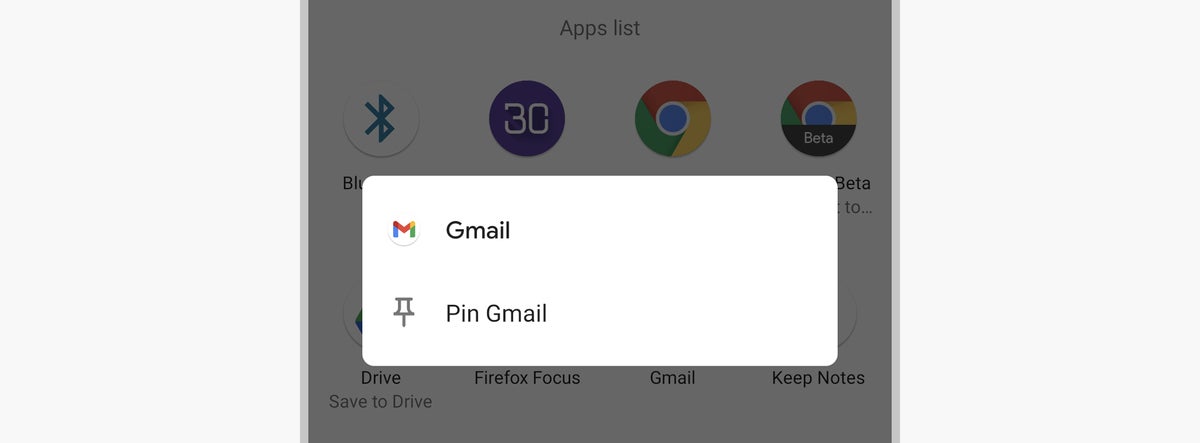
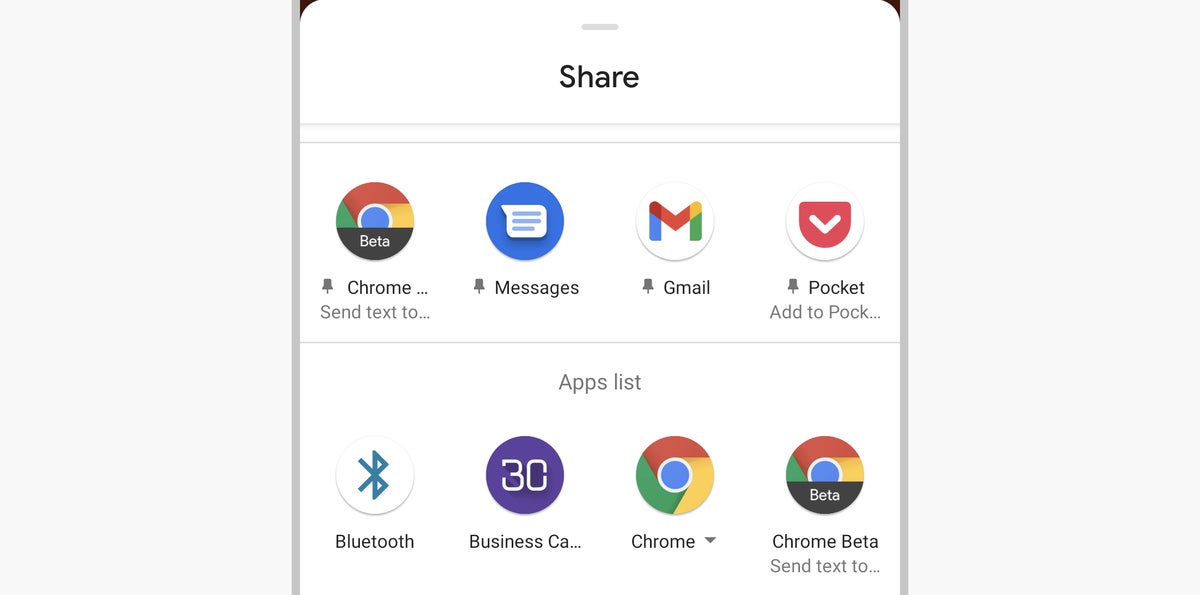
12. Another easily overlooked Android 11 goodie is the software’s addition — or re-addition, to be more accurate — of the ability to pin items to the top of the system share menu and keep your most commonly used targets at the top.
The share menu, in case the name doesn’t immediately ring a bell, is the thing that comes up when you share something from one app to another — like when you highlight text in an email and then tap “Share.” Some Android apps now use their own custom menu for that function, rather vexingly, but whenever you’re seeing the standard system share menu, you can take control of it by pressing and holding any regular icon within its list and then selecting the “Pin” option that pops up.
 JR Raphael/IDG
It may not look like much, but that tucked-away “Pin” option within the Android share menu can save you tons of time.
That’ll cause the app’s icon to remain in a special top row within that menu, above any other items.
 JR Raphael/IDG
Pinned items show up in their own dedicated row at the top of the system share menu, with a pushpin to the left of their title.
You can pin up to four share targets there, and they’ll always appear in that spot in alphabetical order.
Advanced audio, video, and visual options
13. While some Android device-makers have added screen recording systems into their software for ages now, Android 11 marks the first time such a function has been built into the actual core operating system. If you’re using a phone with Google’s version of Android, you can reveal the new system-level Screen Recorder by swiping down twice from the top of your screen to open the Quick Settings panel, then tapping the small pencil icon in its lower-left corner to edit its contents.
Scroll down until you see an icon labeled “Screen Record,” likely toward the bottom of the list. Press and hold it and then drag it up into a position within the panel’s active area.
Back out of that editing tool and look back at your Quick Settings menu to find and use your newly uncovered tool.
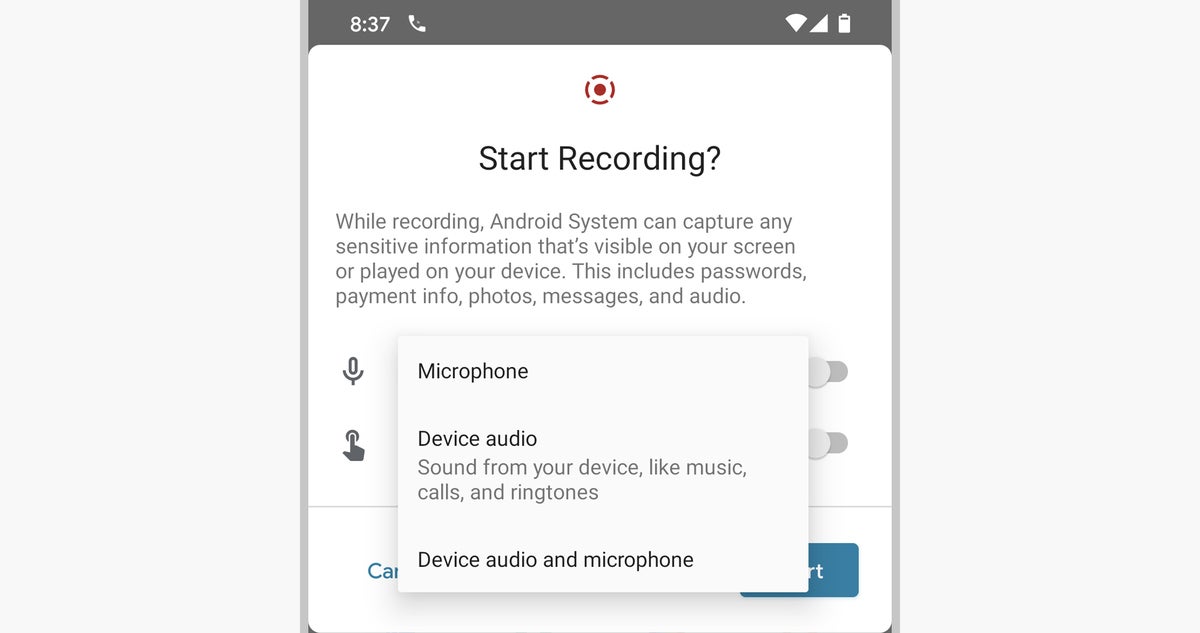
14. You’d probably never think of it, but in addition to giving you an easy way to record demo videos and perform troubleshooting on your phone, Android’s Screen Recorder can let you record an ongoing call — whether it’s a regular phone call or one made over a network (with or without video) via an app. Just activate that same Screen Record function when a call is underway, then tap the “Record audio” line and change the setting from “Microphone” to “Device audio and microphone.”
 JR Raphael/IDG
The “Device audio and microphone” setting will cause the Android 11 Screen Recorder to capture both what you’re saying and what the person on the other end of a call is saying.
Just be sure you’re aware of any laws surrounding that process in your area before you begin. Some states require only one person to agree to any recordings being made during a call, while others require everyone on a call to give consent. Policies vary internationally as well.
15. One of Android’s best hidden features is its ability to pop an actively playing video or even a Google Maps navigation into a small floating window when you move away from the associated app. As of Android 11, that feature gets even more useful with the completely invisible ability to resize the window of any such picture-in-picture box.
Once you have one in place, just drag your finger in or out diagonally on any of its corners to make it bigger or smaller. Who knew?!
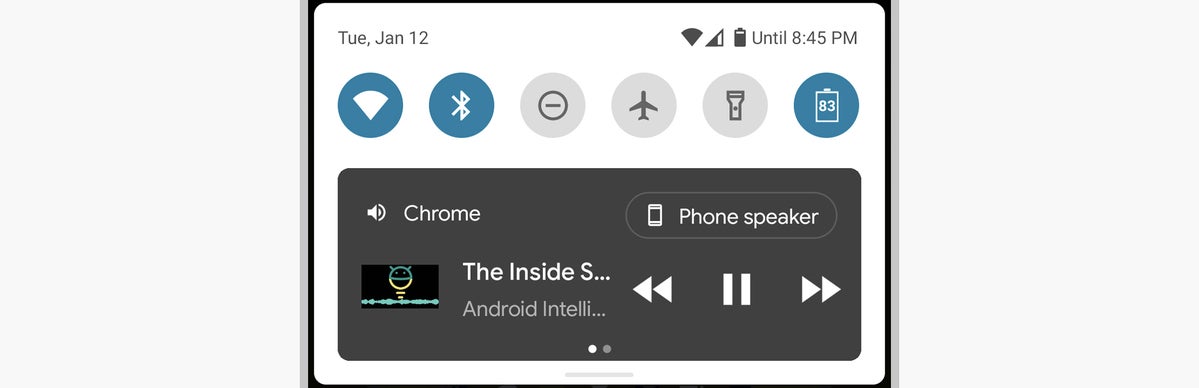
16. Speaking of media, Android 11 introduces an intelligent new consolidated media player that puts controls for any audio or video playing from your phone into a single, streamlined space above your notification panel — instead of having each app create its own independent set of controls that exists as a notification. Sometimes, though, that new player sticks around well past its welcome, long after you’ve finished interacting with the content.
Well, take note: You can press and hold the player to find a tucked-away option to dismiss it and send it a-packin’. If you have multiple players going at once, you can swipe to the right or left on the player interface to move between ’em and then long-press on the player while any source is showing to dismiss it.
 JR Raphael/IDG
You can swipe left or right to move between multiple audio sources in the Android 11 media player and then long-press on any source to dismiss it.
17. If you find the Android 11 media player starts sticking around too long as a general rule, try searching your phone’s settings for media. Unless your device’s manufacturer has removed the option, you should find a setting called “Media player in Quick Settings” (or something along those lines). Pull it up and move the toggle associated with it to the off position. That’ll tell Android that you don’t want it to keep the player around “for an extended period” even after you’ve finished listening.
18. Last but not least, if you frequently find yourself staring at your phone in dim lighting, do yourself a favor and take advantage of Android 11’s new Dark Theme scheduling capability. Look in the Display section of your system settings to find the “Dark Theme” option, then tap its line — the actual text, not the toggle next to it — and you’ll see the newly added “Schedule” feature. You can set the Dark Theme to come on and off automatically at sunset and sunrise, respectively, or you can create your own schedule if you’d rather maintain a different set of nighttime hours.
The other option, of course, is to turn your flippin’ phone off and go to bed already — but that, as we all know, is often easier said than done.