


Chromebooks may be all about simplicity, but don’t be fooled: Beneath their intuitive outer layer lies a web of advanced options. And you don’t have to be a power user to embrace it.
Make your way through this massive collection of next-level tips, and you’ll be zipping around Chrome OS like a pro in no time.
Getting around Chrome OS
1. The Chrome OS launcher — the drawer-like interface that appears when you tap the Everything key (a.k.a. the Search key or Launcher key) or when you hit the circle icon in the lower-left corner of the screen — is actually a powerful universal search tool. Just start typing as soon as it appears, and you can find and open apps, pull up websites, and even get answers to specific questions right then and there — no clicking or digging required.
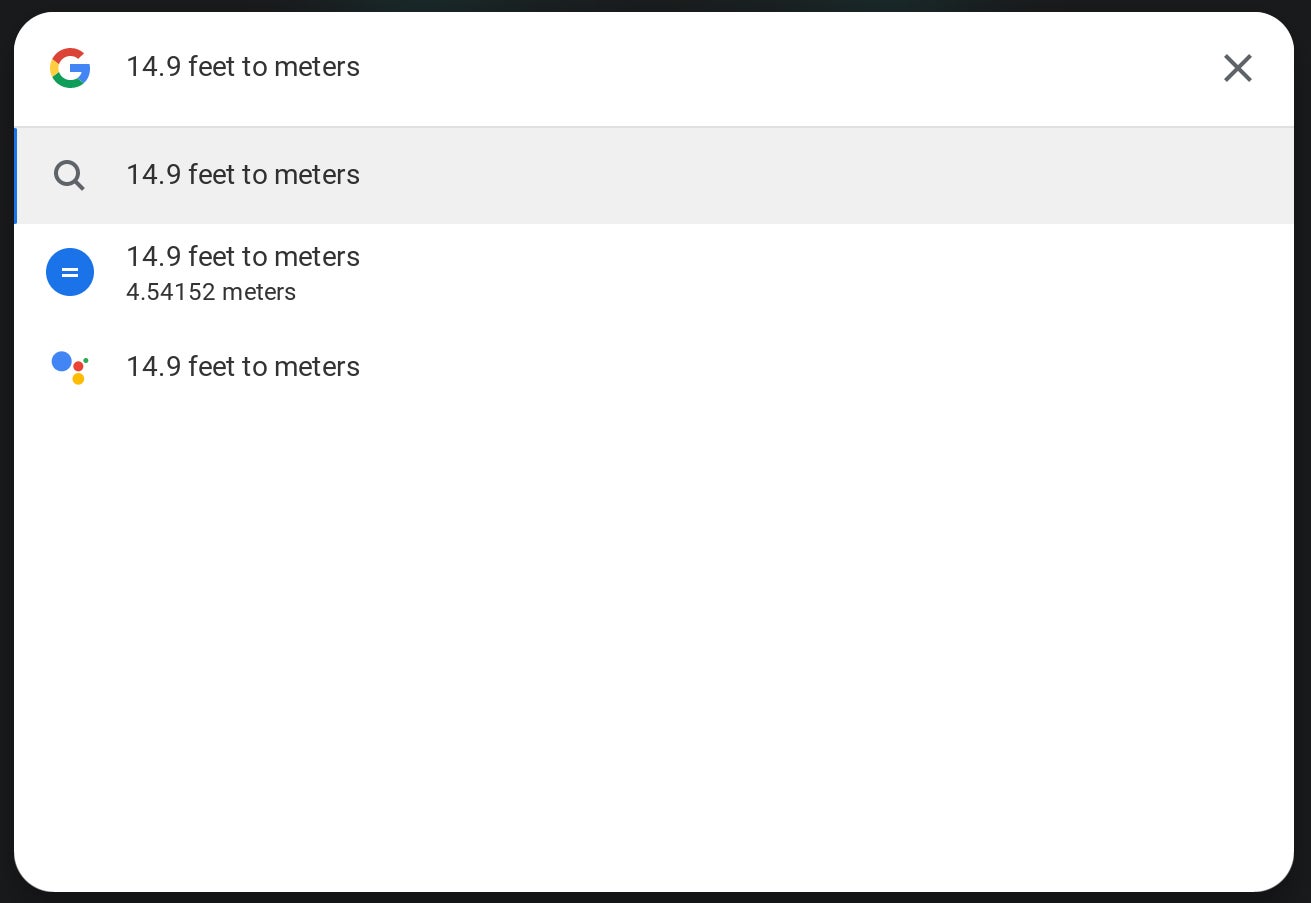
2. The launcher has some easily overlooked extra powers, too. Try typing in calculations like 172.4/3, for instance, or unit conversions like 14.9 feet to meters to put Google to work at the system level.
 IDG/JR Raphael
The launcher’s search box can pull up apps and websites and perform all sorts of other functions. (Click on any image in this story to enlarge it.)
3. On most current Chromebooks, that same launcher panel is also a portal for interacting with the Google Assistant. And that opens up the door to some interesting Chrome-OS-specific possibilities. You could ask Assistant to create a new document, spreadsheet, or presentation, for instance, or ask it what’s on your agenda for a specific upcoming day. (See my list of 22 worthwhile ways to use Google Assistant on a Chromebook for even more useful commands to consider.)
4. Chrome OS has a hidden gesture for accessing the fully expanded app drawer area of the launcher, which is especially advantageous when you’re using a Chromebook as a tablet: Simply swipe up from an open area at the bottom of the screen, and — just like with Android on Google’s Pixel phones — your full list of installed applications will appear.
5. Want to get to the fully expanded app drawer area of the launcher without touching your screen? Hit Shift and the Everything key together. Shazam!
6. You can hide the shelf — the row of pinned favorites at the bottom of your screen — either by right-clicking it or long-pressing on it and then selecting the “Autohide shelf” option that appears. That’ll cause the shelf to disappear anytime you have an app or window open and then reappear when you mouse over its area or swipe upward from the bottom of the screen. The shelf will still always show up when you’re viewing your desktop, too.
7. Quickly open any item on your shelf by pressing Alt and then the number key that corresponds with its position: Alt-1 for the first app in the list, Alt-2 for the second, and so on.
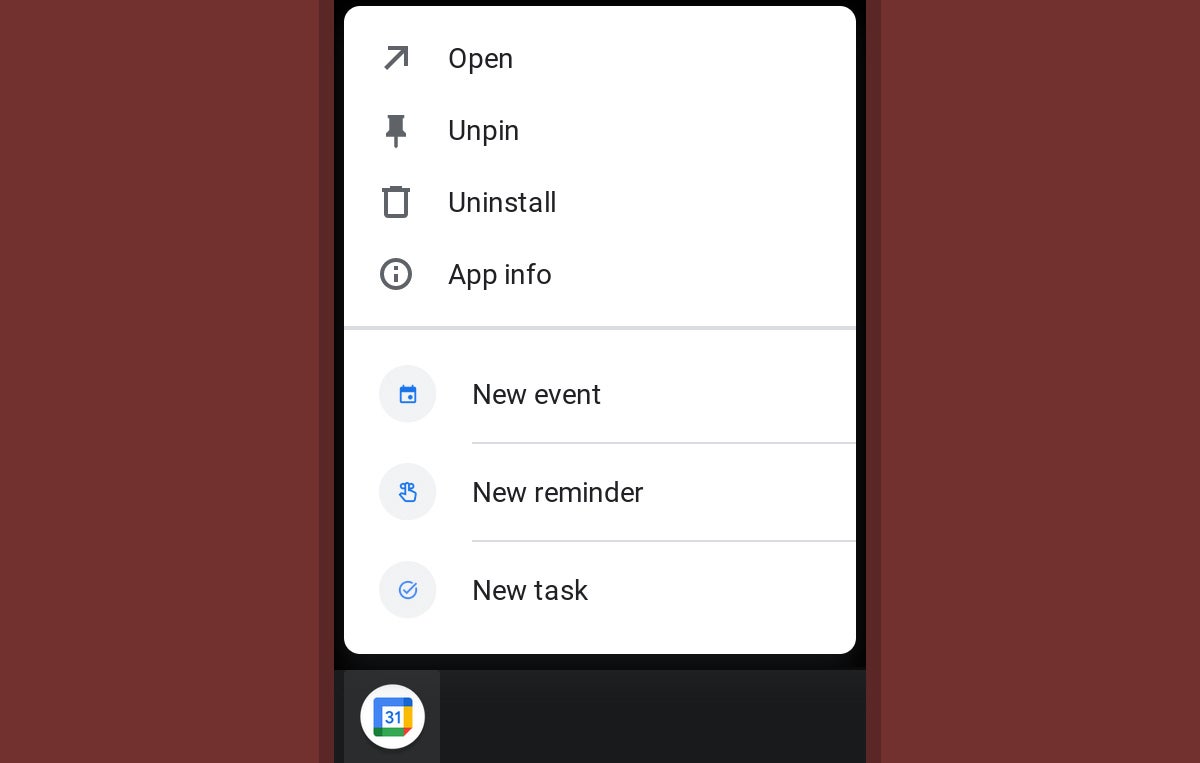
8. Right-click or long-press on any app in your shelf or within the main launcher to reveal a series of program-specific shortcuts. You’ll find the most options with Android apps, many of which offer one-touch links to functions like composing new messages, starting new documents, or jumping to specific folders or accounts.
 IDG/JR Raphael
Time-saving shortcuts are often just a click or press away, especially with Android apps on your Chromebook.
9. Chrome OS boasts a distinctly Android-like combined Quick Settings and notification panel in its lower-right corner, and take note: You can open it without moving your hands off your keyboard by pressing Shift-Alt-N from anywhere in the system.
Managing apps and windows
10. You might not realize it, but your Chromebook has a handy Overview interface for juggling open apps and windows. You can get to it by pressing the button that looks like a box with two lines on your keyboard (in the function row, directly to the left of the brightness controls) — and once there, you can move to any other app by clicking its thumbnail or using the Tab key to focus on it and then hitting Enter.
You can close any app, meanwhile, by clicking the “x” in its upper right corner or by swiping up or down on it directly on the screen (provided you have a Chromebook with a touch-enabled display, that is; otherwise, all you’ll accomplish is creating a smudge and making yourself look silly).
11. Prefer to get around with your trackpad? Make a mental note of this handy hidden trick: You can swipe upward with three fingers on your trackpad from anywhere in the system to open the Overview interface and see all of your open apps and windows. You can then swipe downward with three fingers to return to your most recently used process.
12. When your convertible Chromebook is in its tablet mode (with the keyboard either detached or swiveled around the back), swiping up once from the bottom of the screen will reveal your shelf of pinned favorites. Swiping up again and holding your finger down will open that Overview interface, just like it does with the current Android gesture system, while swiping up and letting go will take you back to your desktop home screen.
13. Also in tablet mode, you can open two apps side by side in a split-screen arrangement by going into the Overview screen and then dragging any app’s thumbnail to the left or right side of the screen. When you see that half of the screen light up, let go — then either select another active app from the Overview interface or open a new app from your launcher to fill the other half. You can set this up with any combination of websites, Chrome apps, Android apps, and even Linux apps (more on those in a moment).
 IDG/JR Raphael
Chrome OS’s split-screen mode can be a valuable way to multitask while using a Chromebook in its tablet mode.
14. While viewing two apps in that split-screen setup, press and hold the black bar in the center and drag it in either direction to make either side larger or smaller.
15. Prefer a snappier Alt-Tab-like method of switching between processes? Your Chromebook has that, too — quite literally: Just press Alt-Tab once to toggle back and forth between your two most recently used apps or windows, or press and hold Alt-Tab to pull up a quick switching utility that’ll let you move among all of your actively open items.
16. Should you ever feel the urge to move backwards in your Alt-Tab list — from right to left instead of left to right — holding down Shift along with Alt and Tab will put you in reverse and let you get it done.
17. Snap any app or window to the side of your screen by hitting either Alt and [ (left bracket) for the left side or Alt and ] (right bracket) for the right side. Repeat the command a second time to return the app or window to its default centered position.
18. You can minimize an app or window by pressing Alt and – (the minus key). Press that same key sequence again to bring the app or window back up into its previous position.
19. Maximize an app or window by pressing Alt and = (the equals key). Press that same key sequence again to move the app back into its default centered position.
20. If you tend to keep a lot of stuff open at once and work on multiple projects at the same time, think about using Chrome OS’s Virtual Desks feature. Like the virtual desktop systems on Windows and macOS, Virtual Desks lets you organize your open apps and windows into separate work environments. You can create new desks and switch between your current desks by looking for the commands at the top of the Overview screen. Note, too, that you can rename any desk from its default “Desk 1”-style name by clicking on its name and typing whatever you want into that space.
 IDG/JR Raphael
Virtual Desks are a spectacular way to expand your organization on a Chromebook.
21. Give your Chromebook’s main app list some extra organization by creating folders within the Chrome OS launcher. All you’ve gotta do is click or tap on any app and then drag it on top of another app’s icon. You can then click or tap to open the folder and give it a name. And if you ever want to take an app out of a folder, just click or tap the app in question and drag it out.
Improving your text input
22. Don’t make yourself use that awkwardly oversized on-screen keyboard that comes up by default in a Chromebook’s tablet mode. Instead, tap the third icon along the keyboard’s top row — the one that looks like a rectangle with a smaller, darker rectangle inside it. That’ll shrink Chrome OS’s keyboard down into a far more manageable phone-like keyboard that you can then move around (using the “handle” at the keyboard’s bottom) and place anywhere you like.
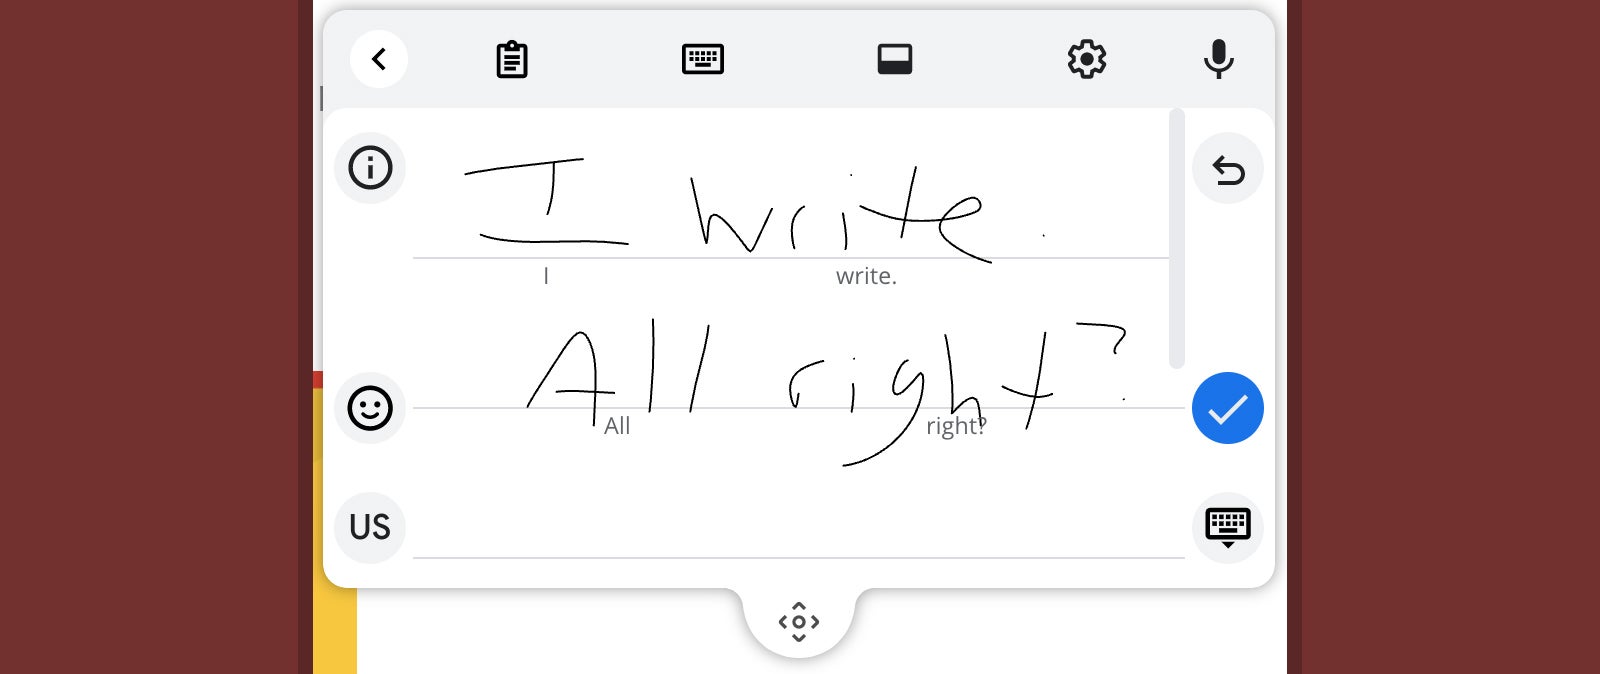
23. If handwriting is more your thing, be it with a stylus, your finger, or any other appendage, tap the second icon along the Chrome OS keyboard’s top row — the one that looks like a hand-drawn squiggle. That’ll give you an open canvas on which you can write anything you want by hand and have it converted into text as you go.
 IDG/JR Raphael
Your Chromebook can convert even the sloppiest, most ridiculous-looking excuse for human handwriting (as seen above) into regular, legible text without trouble.
24. Chrome OS’s on-screen keyboard has a built-in microphone icon that makes voice-to-text simple for tablet use, but you can actually tap into the same superb dictation system even when using your Chromebook with its physical keyboard. Just open up your Chromebook’s settings (by clicking the clock area in the lower-right corner of the screen and then clicking the gear icon in the panel that pops up). Click “Advanced” and then “Accessibility” in the left-sidebar menu, then click “Manage accessibility features” and activate the toggle next to “Enable dictation (speak to type).”
That’ll put a small microphone icon in the lower-right corner of your screen, next to the notification panel, and you can then tap it anytime to start speaking and have your words transcribed wherever your cursor is active.
25. Find yourself missing the Caps Lock key? Press the Everything key and Alt together to activate Caps Lock. When you’re ready to STOP SHOUTING, use that same key sequence to switch back to normal text.
26. Alternatively, if you really miss Caps Lock — and don’t mind giving up Chrome OS’s Everything key to have it — you can remap the Everything key so that it functions as Caps Lock by opening your Chromebook’s settings, clicking “Device” in the sidebar, and then selecting “Keyboard.”
27. You’d be forgiven for failing to notice, but your Chromebook has a built-in clipboard history function you can use to glance at your most recently copied items and then pull any of ’em up on demand. Just hit the Everything key and V together. You’ll see your most recently copied items, whether they’re text or images, and you can then click on whichever one you want to insert into an open field.
 IDG/JR Raphael
Chrome OS’s clipboard history function is completely invisible, but once you find it, you’ll never forget it again.
28. Find the perfect emoji to lighten up an email, company tweet, or Slack chat by pressing the Everything key, Shift, and the space bar together. That’ll open up Chrome OS’s handy emoji picker, and from there, selecting the symbol you want is as easy as 🥧.
NEXT PAGE: Simplifying security, embracing system tools, and beyond