Android 12 may seem like old news to those of us in the land o’ Pixels at this point, but hold the phone: Google’s latest software has some pretty phenomenal features that are lurking beneath the surface and all too easy to overlook.
We explored a dozen such treasures the other day, but there’s even more juicy goodness where that came from. So here now are seven more spectacular hidden gems you’ll absolutely want to dig up in Android 12 on your Pixel phone — regardless of whether you’re packin’ the new Pixel 6 or Pixel 6 Pro or one of the older Pixel models.
Check ’em out, get yourself in the habit of using ’em, and then come sign up for my free Pixel Academy e-course to uncover even more hidden Pixel magic.
New Pixel trick No. 1: Fast link-grabbing
Android’s Overview area — y’know, the card-driven app-switching interface you see when you swipe up from the bottom of your screen and then hold your finger down, using the current Android gestures system — has gotten some seriously cool superpowers on Pixels as of late. And with Android 12, your favorite Googley phone has another tucked-away time-saver to discover there.
So here it is: Anytime you look at Chrome in your Overview area, you can grab the link of the currently open page with one quick tap — without ever leaving Overview or opening the app. And from there, it’s just one more press of your precious fingie to copy the link or share it anywhere else on your phone.
How to find it
This one’s easy:
- Open the Overview interface by swiping up from the bottom of your screen about an inch and then stopping — or, if you’re still using the old legacy three-button nav system, tap the square-shaped button on your phone’s lower edge instead.
- Find Chrome in your list of recent apps.
- Look for the curiously shaped link icon in the thumbnail’s upper-right corner.
 JR
JR Tap that icon, and shazam! You’ve got your link.
 JR
JR New Pixel trick No. 2: Quick device controls
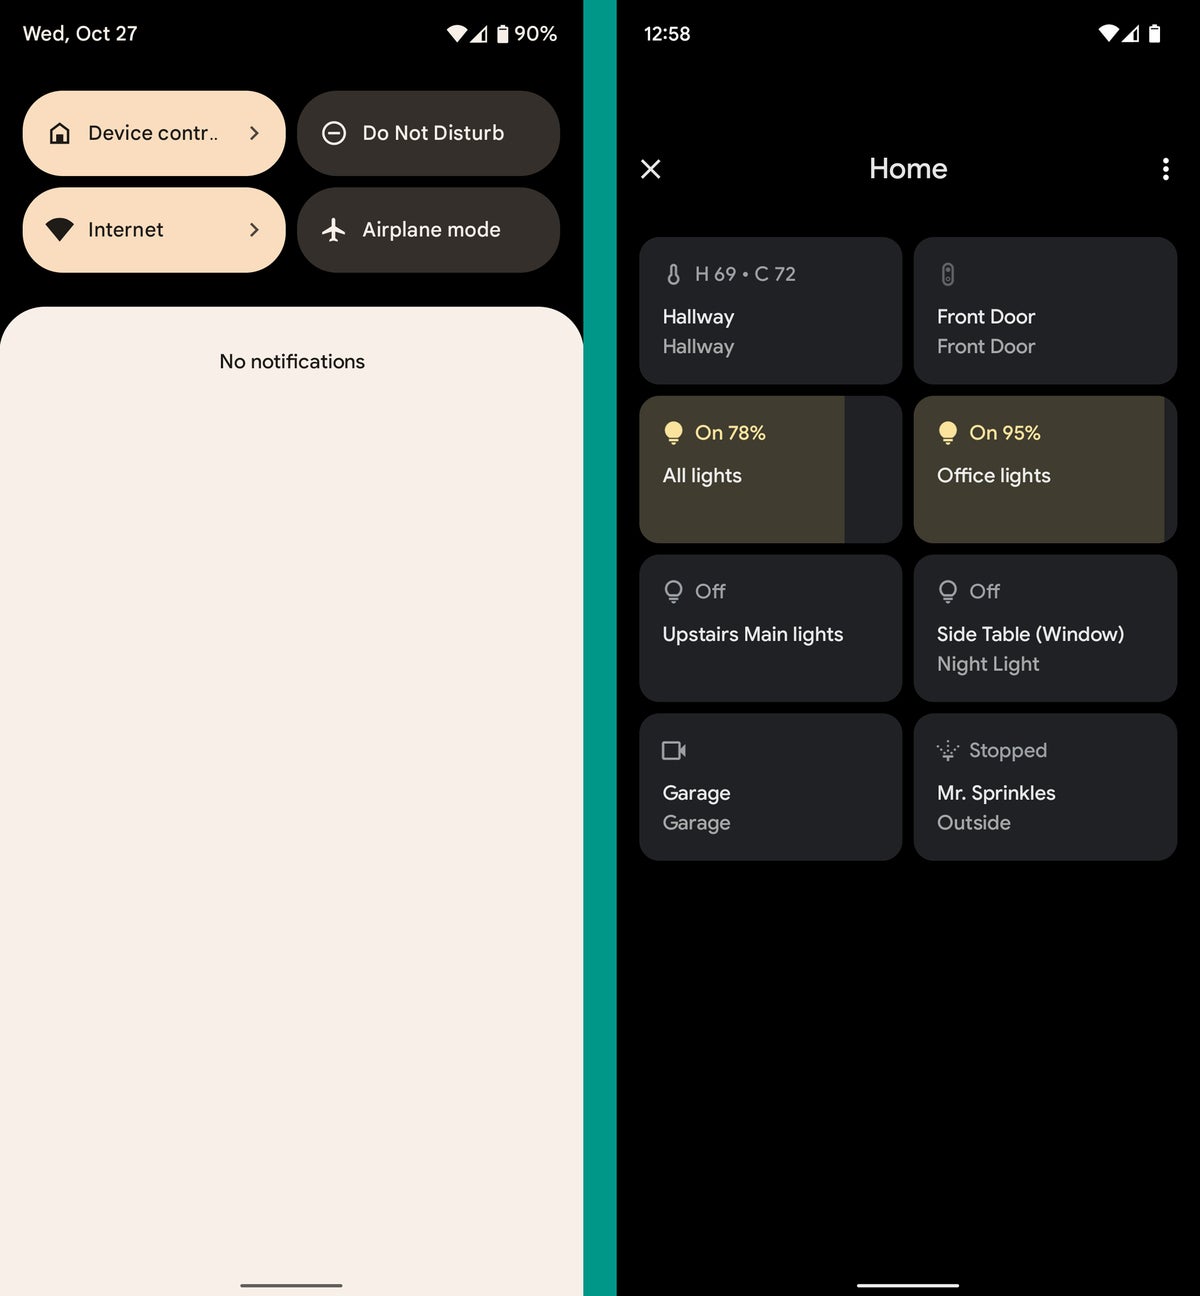
One of Android’s best buried treasures is the device control panel introduced in Android 11 and then weirdly tucked away to an out-of-the-way place in Android 12. Fear not, though, for your Pixel’s fancy new software has a couple cool ways to bring that panel back to the forefront.
The panel, in case you aren’t familiar, gives you easy access to adjusting any connected devices associated with your account — smart lights, cameras, thermostats, speakers and displays, e-rodents, you name it. It’s an awesome time-saver, but it’s up to you to pull it out of Android’s bowels and make it accessible.
How to find it
First things first, you need to download the confusingly named Google Home app, if you haven’t already, and make sure you’re signed into it and set up with any connected devices you’ve got. And don’t let the app’s name fool you: It’s essentially just an interface for interacting with any and all connected gadgets, no matter where they are or what purpose they serve (ahem).
Once you’ve got that up and running:
- Swipe down twice from the top of your screen and tap the pencil shaped icon in the lower-left corner of the Quick Settings panel.
- Scroll down until you see the “Device controls” tile. It may well be at the very bottom of the list, way down in the inactive tile area.
- Touch and hold your finger to that tile and drag it all the way up. I’d suggest putting it into one of the top four positions, which will make sure you can always see and access it above your notifications with just a single swipe down from the top of your screen.
 JR
JR And there’s another new Android-12-added Pixel feature along those same lines…
New Pixel trick No. 3: A smarter lock screen
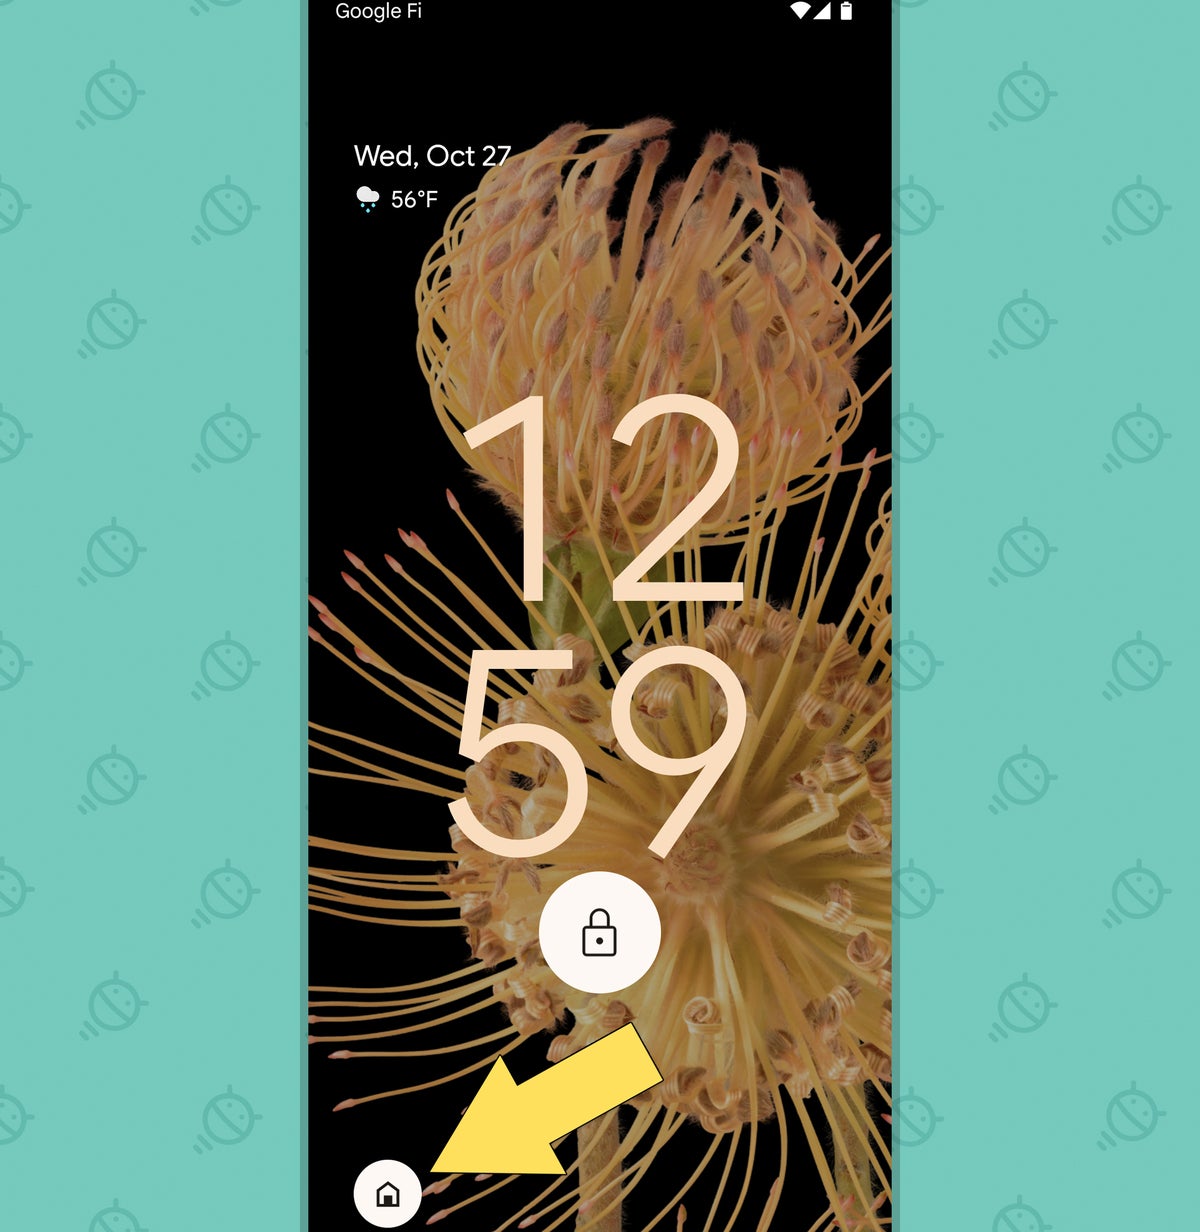
In addition to showing basic info like the time, weather, and any pending notifications, your Pixel’s lock screen can offer up a one-tap shortcut to that connected device control panel. In fact, the shortcut might already be there, but there’s a decent chance you haven’t noticed it or realized what it does.
How to find it
Once you have the Google Home app installed and configured, look for a subtle house-shaped icon in the lower-left corner of your Pixel’s lock screen:
 JR
JR See it? Purty, right? Tap that house and tap it good, and you’ll be staring at your connected device controls faster than you can say “Hey Google, house it goin’?” (as one does).
If you have the Home app set up but don’t see that icon on your lock screen:
- Panic and scream loudly. (Just kidding. Don’t actually do that.)
- Open up your system settings and head into the Display section.
- Tap the line labeled “Lock screen.”
- Look for the “Show device controls” toggle and make sure it’s in the on position.
While you’re there, take note: You can also turn on a toggle in that same area to show an icon for your wallet on your lock screen and keep your Google Pay card selector one tap away. You’ll need to have the Google Pay app installed and configured in order for that one to work.
New Pixel trick No. 4: The kill switches
Among its many under-the-hood privacy enhancements, Android 12 introduces a pair of new kill switches that make it super-easy for you to disable your Pixel’s camera or microphone anytime the need arises. They also have the advantage of allowing you to talk about using “kill switches,” which makes you sound totally hard-core…until people figure out that you’re actually talking about an advanced privacy feature on your Google Pixel phone.
But, hey, I won’t tell if you don’t. So let’s find and enable those options, shall we?
How to find it
We’ll need to mosey our way back into your Pixel’s Quick Settings editor to dig these lovely fellas up:
- Once again, swipe down twice from the top of your phone’s screen and tap the pencil shaped icon in the lower-left corner of the Quick Settings panel.
- Scroll all the way down to the inactive tile area at the bottom of the list and look for the tile labeled “Mic access.”
- Press and hold your finger to that tile and drag it up into the active area of your Quick Settings — in whatever position you like. (Just remember that the first four tiles are the ones you’ll see with a single swipe down from the top of the screen, while the first eight are the tiles you’ll see with two swipes down. Anything beyond that will require an additional swipe to the side to access.)
- Repeat that same process with the “Camera access” tile.
- Whoop vigorously in celebration.
 JR
JR After that, it’ll just be a single tap on either of those tiles to turn off the associated function and know no one can possibly see and/or hear whatever it is you’re up to (you naughty, naughty bird).
New Pixel trick No. 5: Color coordination
Android 12’s Material You theming system is surprisingly impressive, but for some reason, one of its most prominent elements seems to be disabled by default on Pixels that are upgrading to Android 12.
That element is the auto-theming of icons on your home screen so that they’re coordinated with your current wallpaper and the rest of your phone’s dynamically changing motif. It’s a subtle touch and a purely superficial one, but it really does create a nice effect and make a meaningful difference in how pleasant your phone is to use.
How to find it
Provided you’re using your Pixel’s default Pixel Launcher home screen setup:
- Press and hold on any blank space on your phone’s home screen.
- Tap “Wallpaper & style” in the menu that comes up.
- Scroll down on the next screen you see until you find the “Themed icons” option.
- Flip its toggle into the on position.
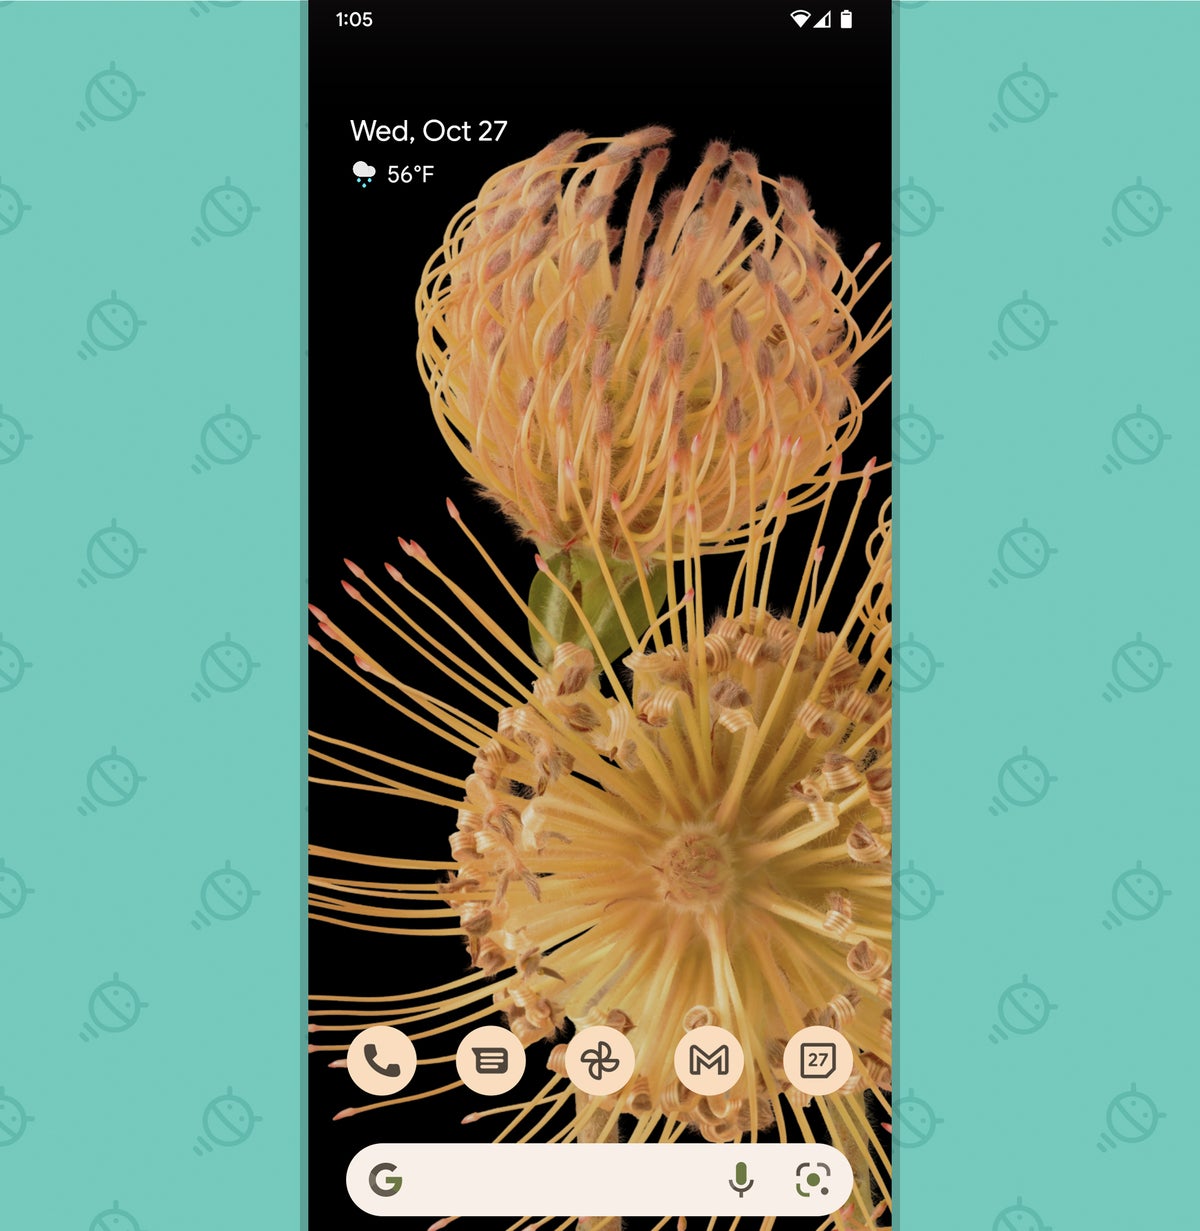
And, ta-da:
 JR
JR Pretty spiffy, wouldn’t ya say? Just note that as of now, it’s mostly only Google apps that are affected by this system. It’ll take some time for non-Google app developers to get on board with the system and start empowering their apps to be a part of it — but with any luck, we’ll see more of that soon.
New Pixel trick No. 6: A simpler Assistant shortcut
Google Assistant’s got tons of worthwhile time-savers, with new options showing up all the time (especially here in Pixel Land!). But uttering “Hey Google” isn’t always the most practical way to summon your trusty virtual companion. And Android’s swipe-up-from-the-corner-of-your-screen gesture for activating Assistant is often awkward and inconsistent (which might be at least in part why Google disabled it by default on the new Pixel 6 devices).
Well, take note: As of Android 12 on a Pixel, you’ve got another option — and it’s about as easy as can be: A simple press and hold of your phone’s physical power button can pull up your friendly neighborhood genie and have it standing by to help with whatever you need.
B-b-b-b-b-but — oh, yes — you’ve gotta find and activate the feature first.
How to find it
Thankfully, there’s not much to this process:
- Open up the System section of your Pixel system settings.
- Tap “Gestures.”
- Look for the line labeled “Press and hold power button,” and tap it.
- Activate the toggle next to “Hold for Assistant.”
That’s it: Now just press and hold that protruding ol’ power button of yours, and your Assistant will be there in a flash. When you want to power down your phone or access any other items in the traditional Pixel power menu, press the power button and the volume-up key together (and that’ll override the previously available muting shortcut connected to that same key combination).
New Pixel trick No. 7: Tap action
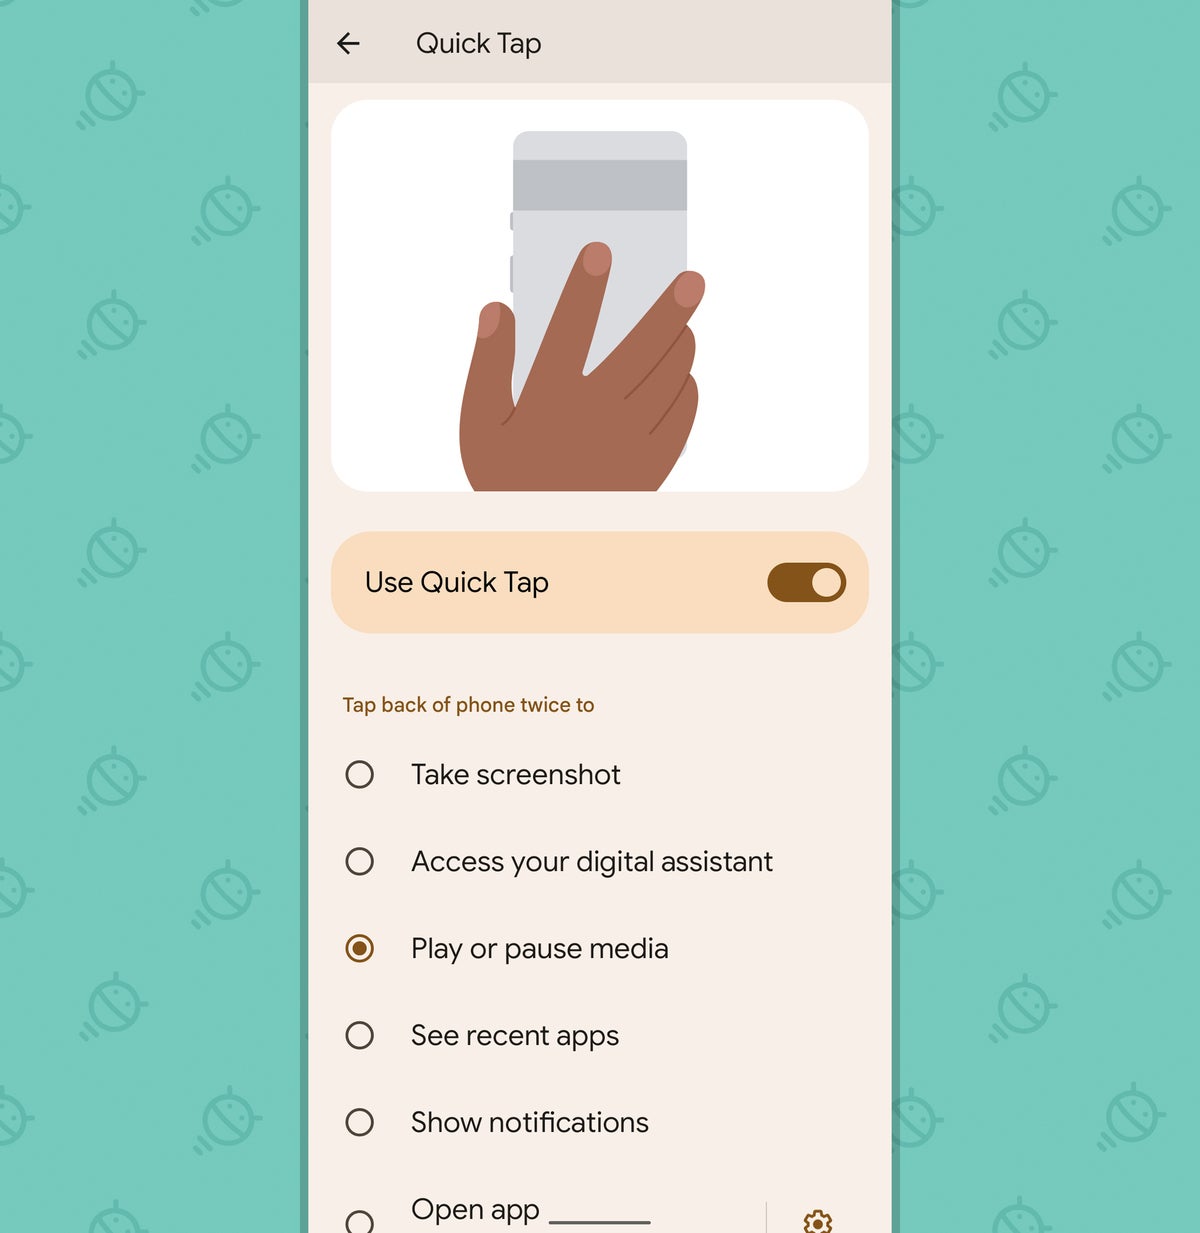
If you love shortcuts as much as I do, you’re gonna adore this final Pixel-specific Android 12 treat. It’s a new system that lets you tap twice on the back of your phone to have a specific action performed — capturing a screenshot, summoning Assistant, playing or pausing any active media, opening your recent apps, opening your notifications, or opening any app you want (whew!). As an added bonus, it also makes a lovely percussive pitter-patter.
So, yeah: This new Pixel option is pretty forkin’ fantastic, to say the least. The only catch is that is seems to be available only on the Pixel 4a 5G and higher — so the Pixel 4a 5G, Pixel 5, Pixel 5a, and then the new Pixel 6 and Pixel 6 Pro models (but not, curiously enough, the regular Pixel 4 or Pixel 4a devices).
How to find it
If you have the Pixel 4a 5G or higher:
- Go into the System section of your phone’s settings.
- Tap “Gestures.”
- Tap the line labeled “Quick Tap.”
- Flip the toggle at the top of the next screen into the on position.
- Select which action you want your taps to trigger.
 JR
JR If you go with the “Open app” option, be sure to hit the gear-shaped icon along that same line to select which app, specifically, you want to have open.
And if you find your phone is activating the tap action inadvertently, when you aren’t actually tap-a-tap tappin’, head back into that same area of the settings and try activating the “Require stronger taps” toggle to see if that helps.
Not a bad bag of tricks to have, eh? And hey, don’t forget to come join my free Pixel Academy e-course to keep the momentum going. You’ll get seven spectacular days of efficiency-enhancing Pixel knowledge — starting with some camera-centric smarts and moving from there to advanced image magic, next-level nuisance reducers, and oodles of other opportunities for pro-level Pixel intelligence.
Your Pixel productivity journey is just getting started, my dear Pipsie, and we’ve got plenty more ground left to cover yet.

